
CaSTaway/Palm - An Atari ST emulator for Palm OS handhelds
Jeff Mitchell, Codejedi
"CaSTaway" Atari ST emulator originally by Joachim Hoenig.
"CastCE" port for Pocket PC by Ludovic Olivencia and Andrew Gower.
"CaSTaway/GP" port for GP32 by Jeff Mitchell.
"CaSTaway/Palm" port for Palm OS by Jeff Mitchell.
"Atari" is copyright "Atari", "Infogrames", and whatever else they may be
called now.
- Credits
- Useful Links and Contact Information
- Status and Compatability
- File Extension Reference
- Installation
- Device and Expansion Media Requirements
- First Time Installation
- What Not To Run (Hacks, etc)
- Recommended TOS Versions
- Recommended Disk Images
- Installing Disk Images
- Upgrading CaSTaway/Palm
- Upgrading Game Database
- Running Castaway/GP
- Introduction Screen
- Working With the Picker
- Audio and Frames-Per-Second
- Toggle into Game Listing Menu (Not Yet Implemented)
- Game Lookup Database
- Running the Emulator
- Pausing the Emulator
- Mute and Autofire
- Runtime Input Modes
- Pulldown Menus
- Configuration Menu (Not Yet Implemented)
- Runtime Throttle, Frameskip, Volume
- Gamma and Brightness (Not Yet Implemented)
- Note Multi-Floppy Games
- Saving
- Saving State Snapshots
- Saving Disks to SMC
- Configuration Files (Not yet Implemented)
- Defining Custom Input Mode (Not Yet Implemented)
|

|
Credits
The emulation core is entirely derived from the SourceForge Castaway and
CastCE projects; credit must go to them first and last to me for this
work would not have been possible without them. The GUI, games database
and many extensions and ports (such as GP32 and Palm OS work) are all
homegrown. Database content is donated from the public as part of a
project to catalogue Atari ST games.
Thanks also to the great community that has come up around CaSTaway/GP and
CaSTaway/Palm!
The games database is mostly populated by data submitted by users of
the GP32 application. The compatability website is donated (thanks DWN!) and
the data is again entered by you guys. Thanks for the eternnal comments
and questions that drive me forward!
Thanks to the developers of yesteryear who made the Atari ST scene
what it was :)
Useful Links and Contact Information
Of course, the CaSTaway/Palm homepage is useful and contains links to
other resources and things of use:
Codejedi CaSTaway/Palm
You might also be interested in our GP32 version:
Codejedi Castaway/GP
Or write:
support@codejedi.com
Other assorted links:
Status and Compatability
CaSTaway/Palm is very stable and highly compatible. Crashes are rare if
you ever see one at all, and most Atari ST game disk images will work well.
However, for an emulator of such a fantastic machine to work on handhelds,
sacrifices must be made, so it is not a perfect emulation of the entire
hardware, so some games will not work right or well, though most are
quite right. Many "demos" will not work, due to how mcuh they pushed the
hardware and depended on it working in specific undocumented ways.
We recommend using disk images of original disks where possible; the
various crack groups sometimes made the game loaders more complex than needed,
or broke the game a little, etc. Original disks tend to be more compatible
than cracked ones.
File Extension Reference
Various file extensions are used by CaSTaway/Palm. In general you needn't
concern yourself too much, but for reference here they all are:
| .ST | Atari ST raw disk image |
| .MSA | Atari ST compressed disk image (Magic Shadow Archiver) |
| .ZIP | Atari ST raw or compress disk image, zipped (not supported in early versions of the emulator) |
| .RAW | A CaSTaway/Palm savestate (for fast loading!) |
| .SAV | An Atari ST disk image saved from CaSTaway/Palm (a savegame probably) |
| .CNF | CaSTaway/Palm config file |
| .TXT | CaSTaway/Palm config file |
| .IMG | Atari TOS ROM (The ST operating system, dumped from ROM chips) |
Installation
Device Requirements
Emulating an Atari ST is a pretty big job, so we need a certain level of
device to be capable of running such an emulator halfway well. CaSTaway/Palm
can run in two main modes.. an "ideal mode" (where it runs with all the
resources it wants), and a "low ram mode" (where it runs with fewer resources
than it would like, but can still run).
CaSTaway/Palm needs about 2.5MB of "heap runtime RAM" to run in low ram mode,
and needs about 4.6MB of heap RAM to run in ideal mode. When you run
CaSTaway/Palm, the About window will show in the bottom corner how much heap
RAM you have in your device. (So you can pull down the menus and hit
About to find out)
To summarize, no OS4 or earlier device is capable, and many early OS5 devices
are also ineligible. The Palm Tungsten T and T|T2 are not workable, nor is the
T|E for example. The Palm Tungsten T|T3 and T|C work very well, however. For
Sony units, the UX-50 should work very well (aside form lacking good control
keys), and the later NX units shoudl be okay (The NX80 in ideal mode, the NX70
in low RAM mode, and maybe some of the others). I will try to reduce RAM
requirements over time, but it is rather tedious, so may take awhile if its
possible to do at all.
Expansion media is required. Atari ST disk images and ROMs are quite
large and it would just not be overly useful to cram a few dozen 1MB files
into your main RAM. I can build a loader for such files if required, but
early versions of the emulator do not support that sort of thing.
You can assume Atari ST disk images to be between 600k and 1MB each. The TOS
ROM file you need is usually 200k in length, so is not a large concern.
First Time Installation
- Create an AtariST directory within /PALM/Programs on your handheld. (Use
Filez (freeware) or your launcher if its a 3rd party one such as ZLauncher,
LauncherX, or others.)
/PALM/Programs/AtariST is the full path
- Find yourself an Atari TOS ROM image file. TOS is the Atari ST basic
operating system and is needed for anything to run. You may dump
one from an Atari ST or find one somewhere. You may find one called
TOS_102.IMG, or TOS102US.IMG, or ROM, or TOS.ROM or whatever, but make
sure its installed as TOS.IMG (thats what CaSTaway/Palm looks for!).
Just rename it to TOS.IMG before uploading to the handheld.
- Install the castaway.prc into your handheld by double
clicking on it. You can install it to expansion media if you like.
(In older versions of the emulator, there were multiple versions of the
application included in the distribution; this is nolonger necessary
so there is only one.)
- Install any disk images you want; they must end in .ST or .MSA and be
no more than 8 characters in the main filename.
Note that in low RAM mode you can only use .ST disk images in
drive A: of the emulated ST. For ideal RAM mode, you can use both .ST
and .MSA disk images however you see fit.
.ZIP's of .MSA or .ST are not usable in early versions of the emulator,
though may be fine in later versions.
- You do not need any disk images in order to launch the emulator, though
you do need a TOS.IMG file. If you launch the emulator without
inserting any disks, the drives will not be available, but the ST will
boot and show you its pretty little green desktop :) A blank disk image
is included within the emulator distribution.
- The ST Games Database is included within the castaway.prc application
files.
BLANK.ST is a dummy that doesn't have much useful stuff, but
they do boot to the desktop so you can mess around, and do include a ROM
dumping tool for dumping a TOS.IMG file from your very own Atari ST!
What Not To Run
CaSTaway/Palm needs every ounce of performance it can get from your
device's processor in order to run efficiently. Many or most "hacks" for OS5
cause severe slowdowns to CaSTaway/Palm; for instance, the Palm
Keyboard driver when activated slows down CaSTaway/Palm by more
than 50% due to how they interact. So please please turn off
your keyboard drivers, ScreenShot hacks, launcher hacks, etc, while
CaSTaway/Palm is running otherwise it will perform terribly.
Recommended TOS Versions
CaSTaway/Palm supports the TOS 1 series, which is to say TOS 1.0, TOS
1.02 ("1.2"), 1.04 ("1.4", "Rainbow TOS"), and even some others like
KaosTOS. The TOS 2 and later are not supported.
It is recommended to use TOS 1.02 for maximum game and emulator
compatability, however.
TOS 1.0 had some bugs while TOS 1.4 was a superior TOS overall, didn't
like all games. Since you're not (likely) using the Atari ST for serious work,
game compatability is your main concern here, so use TOS 1.02 which is
readily available across the Internet. (There is also the FreeTOS project
to create a new TOS, but I have not investigated it at all.)
So use TOS 1.02
Recommended Disk Images
For maximum compatability, it is usually best to work with disk images
made from the original disks of a game. Often the cracking process
or the cracking groups compressed loader or the like introduced some
complexity that could screw up CaSTaway/Palm, or sometimes even a real
Atari ST. Most cracked disk images will work well, but a few
have shown problems that originals have not.
For example.. it is known that Automation 97 (Dungeon Master and OIDs)
will not always work with TOS 1.02 on CaSTaway/Palm, but will work with TOS
1.04 in CaSTaway/Palm. However, the original Dungeon Master disk images will
work on any version of TOS that CaSTaway/Palm supports.
Installing Disk Images
Installing non-Palm files to a Palm OS handheld is always a little tricky,
but there are a few approaches you can take.
- Hotsync (new in 0.7.11!)
- Card Reader/Writer device
- Card Export, MSExport, etc
- Tricking Palm Desktop
As of version 0.7.11, you can just hotsync disk images over! You will
need to install and run 0.7.11 at least once.. itneeds to have been run for
Hotsync to recognize that it is taking over. Then just use the Palm Install
Tool and drag your .MSA or .ST images into it. Make sure to use "Change
Destination" if you need to, to make sure they're going to the right
expansion media slot or card. Then close the Install Tool and just press
hotsync! CaSTaway will put the .ST and .MSA files into its own directory
on the expansion card without any tricks.. but be prepared to wait.. Hotsync
is not really fast when it comes to this sort of large file!
With a card reader/writer plugged into your desktop machine, you can just
copy disk images and ROMs to your memory stick or SD card or the like
VERY FAST. This is the best method. With a USB card writer, you can plug it
in, copy disk images, and unplug it, very quickly.
With Card Export (shareware) or the Sony MSExport/Import tools, you can
use your handheld device itself like a card writer; this is a good option, too,
but could cost a few bucks for non-Sony handheld. Sony owners should use
this option, or the card writer option above.
If you're stuck, you can trick Palm Desktop; Palm Desktop knows how to
install .mp3 music files to an expansion card; you can rename an Atari ST
disk image to "A_097.mp3" for instance, and then use Palm Quick Install
to install it to your card -- just drag A_097.mp3 to the Quick Install lower
window and hotsync. Once done, you can use Filez for example (freeware) to
move the file to /PALM/Programs/AtariST, and then rename it back to its
original .ST or .MSA file extension, and all will be well. This is a little
work, and slow, but it does work!
Upgrading CaSTaway/Palm
You can at any time head over to
Codejedi's CaSTaway/Palm homepage
to find the latest versions of the application or the game database.
Upgrading is generally easy... copy castaway.prc to your handheld and
you're done :)
Upgrading Game Database
The latest game database at the time of a distribution is
included in the distributed application but a later version of the emulator
will let you also update it yourself through editting a text file on your
expansion card. So you can always download the latest emulator version to
get the latest database version, or inquire if you'd like to know about
editting and adding to the database.
Running Castaway/GP
Introduction Screen
Early versions of the emulator do not have an introduction screen.
Working With the Picker
CaSTaway/Palm uses a simple interface:
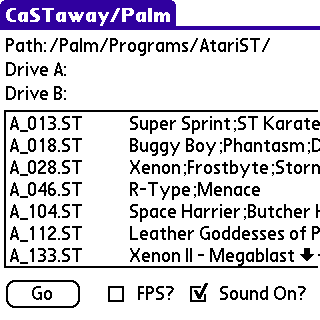
In general, firing up the emulator (assuming your TOS.IMG is properly
installed) follows this flow:
- Page Up/Down to find the disk image you want
- Tap on it to get an action menu
- In the action menu, tap on "Insert into drive A:"
- Hit the "GO" button to fire up the emulator
Of course, you may also wish to hit "Look up in database" to find out
whats on the disk (if its been entered into our database -- and if it is not
you can help us add to the database!)
When you tap on a disk image, you are presented with the action menu:
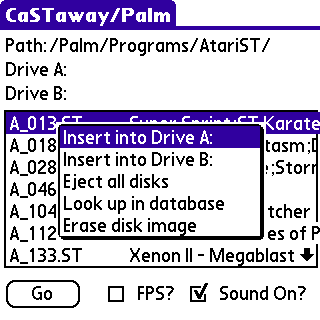
The options are as follows
:
- Insert into A: -- puts the disk image into the emulated drive A: for booting
- Insert into B: -- some games can make use of a two drive system to avoid swapping disks live
- Eject All Disks -- this pops out the disk images; you can chose new disk images anytime by using the Insert operation, but if you wish to change to having no disks inserted, you use this option.
- Look up in database -- this will examine the disk imge and then look it
up in the ST Games Database; if found, you'll see a list of games on that disk
image. If not found, perhaps youcan help us by adding it in -- contact
support@codejedi.com! Note that after the first time you look up the disk,
it will look up nearly instantly!
- Erase the disk image -- hitting this (and confirming) lets you delete a
disk image from the handheld.
Audio and Frames-per-Second
By default on most devices, sound is enabled (checked). For Sony devices it
defaults to OFF, since Sony chose to use a proprietary sound system which is
not supported in early versions of the emulator. This option turns on or off
the emulators *generation* of audio, so turning it off will slightly speed
up the emulation as it has less work to do. If you turn audio on, and then
later MUTE audio, it will not speed up the emulator as it is still generating
the sound, just not playing it, so if you need to squeeze that last bit of
performance out, just turn off sound entirely, by unchecking this option in
the bottom of the Picker.
By default, FPS is always suppressed as most people do not need it, and its
not really accurate anyway. However, if you'd like to fiddle with options and
see how they impact performance, you can turn on the FPS checkbox and a little
display will occur in the top right of the emulation runtime screen, so you can
see how its performing more or less.
Game Lookup Database
The games database is included in the main emulator application to make
your life easier.
When you tap on a disk image while in the disk picking menu
the disk will be looked up in the games database. If an exact match
is found there, the listing of games will be shown onscreen so you know what
is on the disk.
The games database has been built up by volunteers.. people just like
yourself. If you would like to help add to the games database, write to
support@codejedi.com and let us know!
The games database is fairly complete currently, in that it has all the
Automation disks, all the Super GAU disks, all the Zuul and Medway and Pompey
Pirates disks, and various other ones. But it is not 100% complete by
any means. We have tried to put both .ST and .MSA versions into the database
but if your disk image has a different number of tracks or sectors, or
is perhaps an alternate version, or perhaps has an anti-virus or the like in
it, then it may not match up to anything in the database. If you have a lot
of disks that don't turn up results, perhaps consider contacting us to add
your disks into the database!
Pausing the Emulator
When you tap on the application tab to pull down the menus, the emulator
will pause; you can also push the "Pause" button at the top of the PDA
screen to toggle between Paused and Unpaused.
Mute and Autofire
The top right of the screen has a few buttons; Pause (discussed above),
Mute, and Fire. Mute simply toggles audio on and off while the emulator is
running. Fire is quite useful for saving your fingers and device buttons, as
it turns on or off Autofire which is the emulator rapid firing the the
joystick button on your behalf.
Running the Emulator
Once you've inserted the disk images you would like to have, simply press
the "GO" button on the Picker screen and CaSTaway/Palm will try to launch
the emulator. If it cannot find a TOS.IMG file, or cannot allocate sufficient
runtime RAM, or has other issues, then warnings or errors will be shown. If
it acquires sufficient resources to run in low RAM mode, it will do so, though
it will always attempt to go for ideal RAM mode when it can, of course.
Make sure your keyboard driver and other hacks are disabled!
Runtime Input Modes
Due to the variety of input devices the Atari ST could take and the
limited input options on a PDA or handheld, you must
select which inputd are being fed by the PDA controls into the emulator.
For example, you can have
the PDA working the ST mouse, joystick or keyboard.
The default input mode is Mouse/Joystick Mode -- the first part of a mode
is the mouse effect, while the second part is the PDA hardkey effect. So in
Mouse/Joystick mode, you can intuit that tapping on the screen will move the
ST mouse, and pushing buttons on the device will send joystick events. Other
modes can be chosen from the Modes pulldown menu.
If your device has a built in keyboard, or is using the keyboard driver
and an external keyboard like the Palm Wireless or Connected keyboards, then
you may use them to enter ST keyboard events like key presses, too. Keyboard
drivers greatly slow down CaSTaway/PAlm's performance, however.
Additional usage modes are coming as the emulator ages.
Each input mode operates a little differently:
Mouse/Joystick Mode
Summarized, using the mouse is as simple as tapping on the screen, and
using the joystick means using the hardkeys on your device. One tap means to
"place the mouse pointer here", while tapping again quickly means "click".
For example, if you tap once, the mouse gets moved there; tapping again
quickly not only moves the mouse there (on the first tap) but then left-clicks
the ST mouse (on the second tap); a third tap in short order adds another
left-click (wihch you'll know as a double-tap as far as the ST is concerned.
Dragging the stylus around is like dragging the mouse; tap-and-drag to
drag the mouse around, or tap-tap-and-drag to left-click and drag the mouse
around while clicked.
| Tapping the stylus |
Tells the mouse to move to where you tapped, or if the pen tapped only a
moment ago it also does a left click (so double tapping the stylus will both
move the mouse there and do a left-click). (If the mouse moves to
off the side of where you tapped, try tapping in a corner where the mouse is
leaning towards, to cause it to become calibrated again. Some games are
naughty and move the mouse around, so you need to push the mouse to the edge
of the screen by tapping there in order to get it all sorted out.) |
| Double-tapping the stylus |
Clicks the left mouse button; of course, triple-tapping the button will
move the mouse to the first tap, the second tap will be a double tap, and
the next tap will cause a double tap in the ST world. But to us, its just
a series of taps! |
| Dragging the stylus |
Dragging the stylus drags the mouse around; you can "tap and drag" to
pull the mouse around, or you can "tap, tap and drag" to left-click and then
drag the mouse around while clicked. (Just like a normal left-click, but
instead of letting go you keep the stylus moving around)
|
| Tungsten 5-Way D-Pad |
Pushes the joystick around; pressing the Select button pushes fire. |
| Hardkeys (like Datebook, etc) |
The hardkeys are mapped to joy left, right, nothing, and fire. The page
up and down buttons are mapped to up and down on the joystick, of course.
|
Moue/Cursor Mode
Useful for Dungeon Master, Captive, Civilization, RPG's, Wargames, etc etc.
| Stylus |
Same as for Mouse/Joystick Mode. |
| Tungsten 5-Way D-Pad |
Pushes ST keyboard cursor keys. This letd you use your d-pad to move
units around using the ST keyboard. Very handy! |
| Hardkeys (like Datebook, etc) |
The hardkeys are mapped to cursor left and right. The page
up and down buttons are mapped to up and down of course.
|
Custom Mode (Not Yet Implemented)
Shows "Custom" so you know you're in this mode. This is a special mode
in which all the PDA buttons are defined by you. When you first
enter this mode via the Options menu, if no configuration is loaded you
will be presented with a warning and given the option to load a config
file if you've made one.
This mode is only useful if you have created one or more config files
to define how it works.
See the section on config files to learn how to build one.
Pulldown Menus
Many very useful operations are hidden inside the emulator's runtime
pulldown menus. The menus work like you would expect in Palm OS, except
that by summoning the menus you implicitly pause the emulator (otherwise
it draws over the menus and you get shot down in your game :)
To unpause the emulator, tap inside the emulator display.
There are various menus:
EMU -- this menu has options effected the entire emulator. This is
where you find out how to save states for instance, as well as set
the current frameskip and throttle and volume and other goodies.
A -- this is where you eject or insert new disks into drive A:, or
even save the current emulated floppy to a ST disk image on your expansion
media for later re-loading or use on a desktop Atari ST emulator.
B -- same as for drive A:, but with drive B: instead.
MODE -- for picking the current runtime input mode.
HELP -- for the About window
So if a game is multiple disks, you'll need the pulldown menus in order
to change to the second or subsequent disks. If a game takes awhile to load,
then you may wish to drop a savestate so that you can skip all that slow
loading next time, and you'll use the Emu menu to facilitate this.
Runtime Options -- Throttle, Frameskip and Volume

Pull down the Emu menu while the emulator is running, and hit "Adjust
Settings" to get this menu. It is your runtime control panel -- it is
available while the emulation is running and not from the disk selection menu.
Most of this dialog is just sliders to adjust the options:
- Volume -- adjust it and when you return to the emulator it will be
louder or quieter; of course, you can always just MUTE the emulator
by toggling it in the top right of the emulator main screen, or you can
turn off sound generation all together from the disk Picker window (which
speeds up the system, too).
- Frameskip -- skipping frames will speed up the emulator, as instead of
drawing to the PDA's screen we'll just skip it once in awhile. You can
adjust how many frames are skipped -- for instance, right over at the left
is zero frameskip, so every frame is shown. Moving it 1 pixel to the right
will make for a frameskip of 1, so we draw a frame, and then skip a frame.
If you change the frameskip to 10, then we'll draw 1 frame, and then skip
the next 10. If you have a slow PDA, you can turn this up to make the
emu seem to run faster, at the cost of a smooth display. Note that if a
game is chugging away in disk loading (like Dungeon Master, which can
take an entire minute or two to load!), you can crank thr frameskip up to
99 (far right) to get it past that as fast as possible. (Or do it once
and drop a savestate so you never need to go through loading again!)
- Throttle -- the opposite of frameskip; turning up the throttle introduces
more and more waste into the emulator, so that you can slow it down. If your
device is very fast, you may need Throttling.
NOTE: Floating point math can be hard on the emulation and will slow it
down; raytracing,
lots of 3d vector calculation and.. *unpacking* can be slow. So if you're using
compacted-disks (like Automation, Flame of Finland, etc etc) chances are the
games are *packed*, and unpacking (where the screen is flickering) is slower
sometimes on large games.
Some original disks (like Dungeon Master) include compression normally.
While Dungeon Master loads, it may take a good minute or two to get to the
game itself, while it looks like nothing is going on. Rest assurred that
even on a real ST it took a bit of time, though not that much.. its just
working the handheld really hard, so it can take a moment.
This is where Frameskip is useful .. if the game is going to be reading
disks for 2 minutes, you might as well crank Frameskip up to 90 or so
and shave off 50% of your load time by not rendering the screen. In
practice this can work really well, or barely at all, depending on what
the game is doing.
Again, for Dungeon Master, it is best to play at frameskip 1 or 0, but
load at Frameskip 90. The left and right shoulder buttons, while in Frameskip
mode, are plus or minus 90 frameskip. Perfect!
Multi-Floppy Games

The A and B pulldown menus provide options for ejecting and inserting
disks. If you eject the disk, then any emulated disk in the emulated drive
will be tossed out and erased and the ST told its drive bay is now empty.
If you insert a disk, any existing disk is ejected and then you are
prompted to pick a disk to insert.
For example, Civilization is 4 disks (in some distributions anyway).
You boot "Civilization (A)" to get it going. At some point it will ask
for Disk B, so just pull down the A menu,
pick Insert, and tap on the disk image that holds "Civilization (B)".
You may need to wait a moment while the ST loads up the disk image.
You can also save the cached in PDA memory disk image to expansion card
as a brand new .SAV disk image. This lets you save a game to emulated floppy,
and then store the now modified floppy image to card as a real ST disk image.
Thus you
can load your real saved games from the emulated floppy disk, no problem.
Or you could just use a saved state -- see below.
Saving
Saving State Snapshots
A savestate is where you copy the entire RAM of the emulated machine,
along with current values for all the registers and equipment there-in (like
the state of the CPU, sound chips, keyboard processors, etc etc) and
write it out to storage. The goal is that you can load from the savestate
again much faster than going through an entire boot process. This is
especially true for something like a 4 disk game (like Civilization) where
booting it up can take 5 minutes of your life away. In this case it is
best to do the 5 minute boot once, then save your state out to card so that
next time you wish to load, you can open the savestate and be up and going
in about 2 seconds. Thats a serious time and battery saver!
Another popular use of savestates is to save where you are when
your batteries are getting low. If you're afraid of losing your game...
pop out a savestate.
Lastly of course, you can cheat.. every time you get somewhere in a
game, drop a savestate. This is cheating, but at the same time.. maybe we're
a little older or wiser and don't have as much free time as we used to :)
When you drop a savestate, you are prompted for a filename; you can name
it whatever you like, but keepit short (about 20 or 30 characters), and
it must end with .raw for it to work next time. Its good to name it after
the game you're in, maybe with a number to show how far along you are.
To load a savestate, just restart CaSTaway/Palm and pick the .raw savestate
in the picker; it'll ask you if you wish to launch the savestate or delete it.
Launching a savestate is very fast since we just load up the entire ST
state and go.. no loading of the game form emulated disk is needed.
Note that savestates are rather large (about 1MB or so) since they contain
an Entire ST in them!
Saving Disks to Card
This option is designed to simulate the Atari ST save game experience.
For example, if your game allows you to save to Atari ST floppy disks, thats
cool. Most RPG's for example support this, so you can play from day to day.
The problem with an emulator is that when the ST saves to disk, its actually
saving to an emulated disk in the device RAM.. not to a real ST floppy.
So the Save to Card option in the menu lets you get this emulated ST
floppy and write out a ST disk image.. a .ST file. So that you
know its a savegame disk, we use. SAV instead of .ST.
You could, for example, get the .SAV file and copy it to your PC and
rename it to .ST and use it in a desktop-side Atari ST emulation. This
could be handy someday :)
The main purpose however is to save those games, if you don't want to
use a savestate.
To open the .SAV disk image later, just pick it from the Floppy
Selection Menu instead of its .ST disk. It has the same filename proper,
so will sort right in beside it. Just rememebr to use the .ST if you
want the original untouched disk image, or the .SAV if you want the save
disk.