Version 4.0
November 2002
| NOTE: This manual supports three different products. PalmPrint is our general purpose printing software, which prints a wide variety of information itself, and also provides printing services to other applications. SCS Print Server is a stripped down version of the software which only provides printing services to all other applications which choose to support it, and does not itself do any printing. And finally, there are special versions of SCS Print Server which support printing only to a single application. Most of the material in this manual applies to all three versions, with a few exceptions. The name of the application file, which you need to know when you install the software, is PPrint.prc is you have the full version of PalmPrint, and SCSPrint.prc if you have the server version. And when you go to the application window on your Palm to start the application, the PalmPrint icon is labelled "PalmPrint", while the SCS Print Server icon is labelled "SCS Print". |

Whether you downloaded the software from our Web site or received it in the mail,you should have a file called PPrint.prc (or SCSPrint.prc, as appropriate)on your computer or floppy disk or CD, along with a series of companion programs- PalmPrint_Address.prc, PalmPrint_Datebook.prc, PalmPrint_Mail.prc,PalmPrint_Expense.prc, PalmPrint_Doc.prc, PalmPrint_Eudora.prc,and PalmPrint_iMessenger.prc. Please note that some or all of these programsmay be optional, depending on how you licensed your software, that is, you may needto purchase a separate license to use one or more of these companion programs. Ifyou do not have the file PPrint.prc, you cannot proceed. If you do,here's how to install it on your Palm handheld device:
Select the HotSync menu from the "Instant Palm" menu onthe upper right of your menu bar; in the sub-menu, select Install Handheld Files.Click on the Add To List button. Locate and select the file PPrint.prc,and click Add File. Click on Add To List again and select PalmPrint_Address.prc,and a third time and select PalmPrint_Datebook.prc. If you want to printmail from the Palm Mail application, you should also install PalmPrint_Mail.prc.If you want to print mail from the Palm VII iMessenger application, you should alsoinstall PalmPrint_iMessenger.prc. If you want to print mail from the Eudoraapplication, you should also install PalmPrint_Eudora.prc. If you want toprint expense reports from the Palm Expense application, you should also installPalmPrint_Expense.prc. If you want to view and print "Doc" filesfrom your Palm, you should also install PalmPrint_Doc.prc. The next timeyou HotSync your Palm, the programs will be downloaded.
Using the Install software that came with PalmPrint: As part of the downloador on this diskette or CD you should see a program named Install (Install.exe)in the same folder as the PalmPrint software (PPrint). Double-clickon Install, and it will copy all of the files to a new PalmPrintfolder in your Palm folder on your computer, and at the same time will performall the steps to install the software in your Palm, except for the final step ofperforming an actual HotSync. When you do your next HotSync, the software will beinstalled in your Palm.
If the procedure above does not work for some reason, or if your desktop computeris supporting multiple Palms, try the "manual" procedures described inthe next few paragraphs; if those don't seem to apply to your setup, please consultthe manual that came with your handheld device (Palm, Handspring Visor, Symbol SPT1500,etc.), which contains instructions on installing applications into the handheld
Using current Palm desktop software: Try this first: Double-click on the filePPrint.prc. If your system is correctly configured with the latest Palmsoftware, a window labelled "Palm Install Tool 3.0" (or perhaps higher)will appear. Check that the user name displayed is the name of the unit on whichyou are installing the software, change it if it isn't, and click on OK. Anew window labelled "Palm Install Tool" will appear with a list of softwareto be installed in your Palm, which should include PPrint.prc. Click onAdd, select PalmPrint_Address.prc, and then again to select PalmPrint_Datebook.prc,and, if you want to print emails from the Palm Mail application, PalmPrint_Mail.prcas well. If you want to print mail from the Palm VII iMessenger application,you should also install PalmPrint_iMessenger.prc. If you want to print mailfrom the Eudora application, you should also install PalmPrint_Eudora.prc.If you want to print expense reports from the Palm Expense application, you shouldalso install PalmPrint_Expense.prc.If you want to view and print "Doc"files from your Palm, you should also install PalmPrint_Doc.prc. Click onDone to show you are done, then on OK to confirm. The next time youHotSync your Palm, the programs will be downloaded.
If the method in the previous paragraph didn't work, try this: Start your Palmdesktop software. Click on the Install button. Check to make sure the Username displayed at the top of the Palm Install Tool window which appears is the username of the Palm handheld device on which you want to install the software; if not,select the correct user name. Now click on Add. Using the file browser whichappears, locate and select the PPrint.prc file, and click Open. Clickon Add, select PalmPrint_Address.prc, and then again to select PalmPrint_Datebook.prc.Nowclick on the Done button, and then on OK. The next time you HotSyncyour Palm, the program will be downloaded.
On most printers, PalmPrint uses the "built-in" fonts of theprinter, so you should NOT install any fonts in your Palm. If you do, they will simplytake up memory and not be used. If you will be using a Pentax PocketJet 200 or SiPixPocket Printer A6, however, the printer does not have built-in fonts. Also, if youwill be using an HP-compatible printer but require accented characters (e.g., Europeanlanguage characters or currency symbols), you may want to install fonts (see thediscussion below under selecting Printer Type for moreinformation about this). In this case you have two options. If you don't installany fonts, PalmPrint will use the Palm "screen fonts" for printing. Allthe fonts (Courier, Times, and Helvetica) will look the same in this case (althoughCourier will still be monospaced and the other two will be proportionally spaced),and their appearance will be less than optimal. Alternatively, you can select fontsto be installed. There are four sets of fonts, which vary in the amount of memorythey require on your Palm, and in quality. "Lo Res Plain" fonts take up36K (approximately), and provide low-resolution fonts in plain only. Bold IS supported;the bold quality is created "on the fly" using the plain font. "LoRes" fonts take up 70K and add a "real" bold font and thus providehigher quality bold. "High Res Plain" fonts take up 101K and provide higherresolution output; "High Res" fonts take up 205K and add high quality boldas well. In general, we think that the "High Res Plain" fonts will be satisfactoryfor most people unless you are using a lot of bold in your output, but if space isa constraint on your Palm, the "Lo Res" or "Lo Res Plain" fontsshould be just fine.
If you are using Windows and run our Install program, you will be givena choice of fonts, and you simply need to select the right option to have the fontsautomatically installed. With Macintosh, we don't provide an installer, but you cansimply use the standard Install Handheld Files menu to select the fonts youwish to install. The fonts, which are "PDB" files (Palm DataBases), arefound inside the Fonts folder, in sub-folders by names which describe their function.It isn't required to install all three fonts (Courier, Times, and Helvetica) if youdon't wish to, but if you don't, and then select a font which isn't installed, theresults will be as if no fonts are installed (that is, Palm screen fonts will beused).
From the Applications window on your Palm, look for the icon labelledPalmPrint (or SCS Print) which looks like this:
![]()
If you have registered the software, and have obtained a serial number from StevensCreek Software, you enter the serial number by tapping on the word *Unlicensed*in the upper right of the main screen. When you do, you'll see this screen appear:
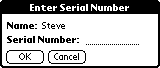
Use Graffiti (or the on-screen keyboard) to enter your serial number (suppliedto you by Stevens Creek Software); when you're done, tap on the OK button.If you enter an incorrect number, the software will let you know. If necessary, tapon the Cancel button to dismiss the Enter Serial Number screen. When you haveentered the Serial Number correctly, you'll see the word *Unlicensed* disappearfrom the main screen.
If you run into a problem, this probably means that when you provided your Palmuser name to Stevens Creek Software, you did so incorrectly. Check the name in theEnter Serial Number screen shown above, and write it down exactly (including case,i.e., whether the letters are upper-case letters like THIS or lower-case letterslike this) and email it to Ste
On the top of the main screen when you open PalmPrint, you will see thisdisplay:
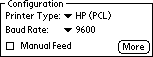
Setting the Printer Type and Baud Rate is the most important part of configuringPalmPrint. We choose to put it in the main screen for two reasons - first,to remind you of how you have the software configured, and second, to allow you toquickly change configurations if you use PalmPrint with more than one printer.
The Printer Type pop-up menu offers you these choices:
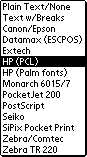
The first choice, Plain Text/None, is provided for the case when you wantto use PalmPrint to send data to another computer, although you also may findthis mode suitable for a number of small receipt printers which don't accept standardprinter languages. In this mode PalmPrint sends out only the text it is askedto send, exactly as it exists. Automatic word-wrapping and page breaks are disabled,and no additional control characters are sent. The next choice, Text w/Breaks,is similar, but in this mode PalmPrint will add margins and line breaks afterthe number of specified characters (as discussed below).If you are not able to directlyconnect your Palm to a printer, either via cable or Infrared, you can use the Textw/Breaks setting to print via your desktop computer (with the Palm in its cradle);this is described in the Using PalmPrint to Transmit Data toA Computer section of this manual.
The remaining choices describe various types of printers and printer languagesthat are in common use. If you are unsure of what language your printer uses, youshould consult the manual that came with your printer. Note that there is not a directcorrelation between manufacturer and printer type. For example, many printers (suchas many Apple LaserWriters) support PCL. Printers from many manufacturers supportPostScript, but often PostScript is an optional capability on the printer so you'llneed to be sure that it's installed on your particular printer. If you're completelyunsure, you can try all the possibilities, but try Epson first, since Epson compatibilityis probably the most common configuration for different printers.
The most confusing choice is probably HP (PCL) vs. HP (Palm fonts).The first of these is the "standard" setting that should be used by mostusers of HP or HP-compatible printers, and relies on built-in fonts within the printer.The second choice requires that you install fonts in the Palm (see above), and usesthose fonts instead of the built-in fonts of the printer. This method requires morememory on the Palm (for the printer fonts), produces slower printing (because moredata has to be sent to the printer), and also produces lower resolution printing,so in general it is not the method of choice. The only reason to do this is if youwant to print certain accented characters or other "special" characters(including various currency symbols like the pound sign, the euro symbol, etc.),which are not supported in the basic mode. This method also produces more accurateword-wrapping for Times and Helvetica fonts (see below), but this is unlikely tobe an important enough consideration to warrant the disadvantages.You are able touse either setting, so you may wish to use the faster HP (PCL) setting forsome print tasks and the slower HP (Palm fonts) setting for others (assumingyou have installed fonts in the Palm).
The Baud Rate pop-up menu offers you these choices:
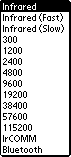
In some cases, you will be able to choose a variety of baud rates; in other casesthe baud rate is fixed by your printer. You will need to determine the appropriatebaud rate. The last section of this manual contains settings for some printers ofinterest, although you may also need to consult your printer manual for this information.If you connect your Palm to another computer (instead of a printer) and use the "PlainText" mode of PalmPrint to transmit information to a terminal emulationprogram (see next chapter), you'll probably be able to vary the baud rate withinthe terminal emulation program (and within PalmPrint).
You'll also see three "Infrared" choices on the pop-up menu. Selectone of these to use the infrared (IrDA) port for printing to IrDA-capable printers.For most IrDA printers, you should select "Infrared," the first choiceon the list. If you encounter difficulties communicating with the printer, thenyou can try the other two choices, "Infrared (Fast)" and "Infrared(Slow)" to see if you can reliably establish communication with either of thosesettings (the Seiko DPU-3445 requires a setting of "Infrared (Fast)",as does the Pentax PocketJet 200). If your handheld computer does not supportIrDA (for example, it's an older, non-upgraded Pilot or PalmPilot), then the softwarewon't let you select Infrared.
If you are using a serial-to-parallel converter cable, data arrive at your printerin a "parallel" mode, but they are sent out of the Palm as a serial transmission,and the baud rate must be set above to match the baud rate required by the serial-to-parallelconverter. Stevens Creek Software sells two different cables for this task. The GA945CE9Mhas a 9-pin connector on one end which mates with either a "HotSync cable"(sold by Palm) or the cable coming from the HotSync cradle. If you are using thiscable, set the baud rate to 9600. The GA945PP has a "Palm serial" connectoron one end which mates directly with all Palm handheld units except the Palm V. Ifyou are using this cable, set the baud rate to 57600.
If you are "printing" to terminal emulation software on your host computer(see Chapter 4), set the baud rate to match the baud rate in your terminal emulationsoftware. If you are printing via cable to the serial port of a printer, the baudrate set in PalmPrint should match that of your printer. Some printers arefixed (typically at 9600 or 19200 baud - the Monarch 6015 requires 19200 baud,for example), while others have baud rates which can be selected. Consult your printerdocumentation for information on what the fixed baud rate of your printer is, orhow to change it if it is adjustable. If you set the baud rate incorrectly, you willoften see output on your printer, but it will consist of nonsense characters. Ifyou see output like that, the likely solution is to change the baud rate. Howeversome printers will not print anything until they receive the final "page eject"command, and if that is garbled like the rest of the page, you will see no outputwhatsoever. In other words, an incorrect baud rate is not a guarantee that you willsee garbled output; you may see no output at all.
IrCOMM is a setting which is used for a special type of IR communications.A few infrared printers support this mode (check your printer documentation), althoughmost will use the standard Infrared option discussed above. IrCOMM can alsobe used to transmit data to personal computers which have an infrared port and whichare equipped with some kind of terminal emulation software which can be configuredto read data from the IR port. If you don't understand this, then most likely thismode of operation isn't for you.
Bluetooth printing requires that you have a Palm device with either built-inBluetooth support (the Tungsten/T model from Palm is the only such model availableas of this writing) or with a Bluetooth card (such as the Bluetooth SDIO card soldby Palm) or "sled". If Bluetooth support is not built-in to your handheldmodel, then most likely there will be some additional Bluetooth support softwareprovided with your add-on hardware that also needs to be installed. Consult the documentationthat came with that hardware for more details. With the Tungsten/T, no additionalsoftware will need to be installed.
For Bluetooth printing you will also need either a printer with Bluetooth support,including the Hewlett-Packard DeskJet 995c, or one of several Bluetooth-to-Paralleladapters that are available (see the chapter in the manual on Connectivity issuesfor more on that subject).
Both infrared (IR) and Bluetooth printing also require some setup, which willbe described shortly.
If you check the Manual Feed box PalmPrint will select the manual feedtray for paper input. In all other cases the built-in paper tray will be used. Thissetting is only applicable to certain printers; on other printers it is ignored.Onsome printers with manual paper insertion, such as the Pentax PocketJet 200, checkingthis box displays a box reading "Insert paper, then tap OK" to allow timeto insert pages.
Clicking the More button will display this screen, which allows you tochoose additional settings:
Char(acter)s per line and Lines per page set the maximum valuesfor those parameters, which are used by the software when it does automatic word-wrappingand page breaks. The values are set by default to numbers appropriate for 8 1/2 x11" paper; change them if you wish. Set lines/page to 0 if you are printingon continuous roll-feed paper and don't want page breaks. Characters per line hasa maximum of 255; lines per page has a maximum of 99. However most likely neitherof these values is correct for your printer; you are responsible for setting thesenumbers to values which are meaningful for the printer you are using.
On two printers, the chars/line is used to set the font size. On the SeikoDPU-3445, if you set the Chars/line to 52 (or fewer), printing will be in thestandard size font for that printer; if you set the Chars/line to 69 (or anythinglarger than 52), printing will be in a small size font. On the Monarch 6015,you can set Chars/line to 48, 42, 38, 32, or 24 (42 is "normal") to getprogressively larger characters.
Note that characters per line will vary with the font size chosen (see below);if you print in smaller fonts, more characters will fit on a line. If you set thecharacters per line too low, and you print a memo which contains paragraphs longerthan one line, the printing will not fill the page, like this:
| This is an example of setting the characters per line too small for the page so that the full page is not filled up as it should be. |
If your printed page looks like this, you can safely increase the number of charactersper line. On the other hand, if you enter a number of characters per line which isgreater than the number which really fit on one line, than the lines will wrap around,like this:
| This is an example of setting the characters per line too large for the page so that each line wraps around because the software thinks the paper is wider than it really is. |
If your printed page looks like this, decrease the number of characters per line.
Left margin and Top margin should be self-explanatory; note thatthe former is measured in characters and the latter in lines. Note that on printerswith continuous roll-feed paper, the top margin setting is also used at the end ofthe printing as a bottom margin to ensure that the paper moves past the cutting mechanism.
Font can be set to Courier, Times, or Helvetica. Automatic word-wrappingis only accurate if you select Courier font. The software counts characters only,not actual character widths, and thus the word-wrapping for proportional fonts (Timesand Helvetica) will be approximate only. If you are printing material which has columnswhich are supposed to line up (such as a table), you must select the monospaced fontCourier in order to get proper output. Font size can be set to 12 pt, 10 pt,and 9 pt. Bold sets the default print to be bold rather than plain.
Orientation can be set to P (Portrait - long axis of the page vertical)or L (Landscape - long axis of the page horizontal). When you change orientation,the Characters per line and Lines per page will change, because there are actuallytwo sets of those numbers, one for each orientation. Changes you make to the Charactersper line or Lines per page always apply to the currently selected orientation. Orientationis applicable only to PCL and PostScript printers and is ignored on other printers.
Line termination can be CR (Carriage Return), LF (Line Feed), or CRLF (CarriageReturn-Line Feed). This comes into play mostly when you are using PalmPrintto transfer information to another computer, in which case the end of line character(s)may affect how the data appears on the receiving computer or software. Leave thissetting at CRLF if you aren't sure, or experiment and see what happens. Whenyou are printing, most printers have some kind of setting (often set by DIP switches)which set the end of line character. Again, if you aren't sure, leave the settingat CRLF, but consult your printer manual for more guidance on the appropriate setting.
Auto-detect IR Printers is used to take advantage of a feature of IrDAcommunication, in which IrDA devices identify themselves by name such as "BJC-80"or "DeskJet 340". If you regularly print to more than one type of IrDAdevice, you probably want to leave this box checked. In that case, if you try toprint to a printer which does not match the currently selected printer type (seton the main page), the software will automatically switch the printer type for you.This identification process does take a fraction of a second, though, and if youonly print to one type of printer, you're probably better off just setting the printertype on the main screen and leaving this box unchecked. Note that if you have anHP printer, checking this box will result in setting the printer type to "HP(PCL)", so if you intended the printer type to be "HP (Palm fonts)",you should leave this box unchecked.
Use CTS Transmit Flow Control should be checked when you are sending datavia serial transmission to printers which may not have a sufficient internal bufferto accept everything being sent; this is particularly true with small receipt printers.This mode may also useful when you are using PalmPrint to send data to anothercomputer and want to ensure the most reliable data transmission. If you are sendingdata via cable and some characters are being lost, it is almost certain that useof this mode will solve the problem. However you should NOT check this settingunless you need to, because if you do so and try to print via the serial portwithout being properly connected, the software may hang (tap Cancel if itdoes).
If you will be printing via infrared, you'll first want to test the IR "connection"to make sure that your Palmcan "talk" to your printer. After setting theBaud Rate to Infrared (see above), point the top of your Palm III (youcan hold it level, you need not turn it so the IR port which is on the back sideis visible) at the IR port of your printer (check your printer manual if you aren'tsure where the IR port is). The distance is critical. You cannot be too far(our experience shows a maximum distance of 20 inches (50 cm), but this will varywith your handheld unit as well as your printer. If your batteries are weak, longerdistances will be less likely to work. You also must not be too close. Again,distances vary, but it seems that as you get closer than 4 inches (10 cm), transmissioncan become unreliable with some printers. Now, once you have the units aligned, tapon the Menu icon and select Test IR Communications from the menu:
![]()
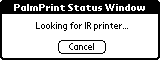
A window labelled PalmPrint Status Window will appear on your screen, and showyou a message "Looking for IR printer..." After a few seconds, it shouldidentify the printer, and you'll see (for five seconds, before it erases itself)a message like this: "Printer ID: BJC-80". If instead you get a message"No IR devices found within range!", you'll know that something is wrong.Check the obvious (did you remember to turn the printer on?) and then experimentwith distance and angle. If you have access to another Palm with IR, you can trypointing your Palm at the other one (make sure the other one is on at the time).In this case you should see a message that says "The IR device found is nota printer!", which will at least let you know that your IR port is functional.
Aside from distance, the only "trick" with IR is timeout issues. Ifyou have a failed communication, you may still have partially engaged the IR softwarein the printer. If this happens, further attempts to communicate will fail, becausethe printer acts as if it's not there. You either need to turn the printer off andon again, or, usually, just wait for a timeout period (15-30 seconds) for the printerIR software to "reset" itself. In other words, don't just keep tappingon Test IR Communications repeatedly, but "give it a rest" for ashort time if the effort doesn't succeed.
Batteries may also be an issue. At a battery level significantly above that atwhich you receive a "low battery" warning from the Palm operating system,IR printing may fail, so for your first attempt at IR printing, make sure you havefresh batteries.
Once you understand the distance constraints and are successful in establishingreliable communications, you'll find that you can successfully communicate with theprinter every time, so don't be discouraged by any initial failures.
If you will be printing via Bluetooth, you'll first want to use Bluetooth to selectthe appropriate Bluetooth device (even if there is only one other one within rangeof your Palm) and to make sure that your Palm can "talk" to your printer.After setting the Baud Rate to Bluetooth (see above), tap on the Menuicon and select Select Bluetooth Printer from the menu. The Palm will searchfor available Bluetooth devices and display that list on screen. Select the one whichcorresponds to your printer and tap OK. You do NOT need to do this everytimeyou print. Once you have "discovered" a printer in this way, PalmPrintwill remember it and as long as you continue to print to the same printer your choicewill remain in effect. Only when and if you want to print to a different printerwill you need to use the Select Bluetooth Printer option again.
After configuring PalmPrint appropriately, you can turn your attentionto the bottom of the screen, where you will see a series of buttons to allow youdifferent printing choices:
If you are using SCS Print Server instead of PalmPrint, the buttonsshown above (and described below) will be replaced by two buttons: Test IRand Test Print. Tap on Test IR to test IR communications with yourprinter, and tap on Test Print to produce a simple printed message to verifythat you have printing set up correctly. After that you won't need to interact withSCS Print Server directly again, you'll just print from your other application(s)which will send their information to SCS Print Server to print.
Tapping on Memo from the main PalmPrint screen will bring you toa new screen on which will appear a list of all your memos (showing you the firstline or so of the memo).
There are three options for printing memos; the current option is shown on thelarge button in the center of the bottom of the screen. If you display all your memos(as selected by the "category selector" in the upper right hand as shownin the example above), the button reads Print All Memos and if you tap it,ALL your memos will be printed, one after the other (you'll actually be requiredto confirm your request in case you do this by accident). If you use the categoryselector to select just one category of memos, you'll see this instead:
Now the button on the bottom reads Print Category, and if you tap the button,all the memos in just that one category will be printed, one after the other.
To print just a single memo, tap the stylus on the memo you want to print (itdoesn't matter whether you are displaying "All" categories or just onecategory), using the scroll arrows in the lower right of the screen if all your memosdon't appear. The memo you select will be inverted (white text on a black background),like this:

The button now reads Print This Memo, and if you tap it, that's what will happen.If you tap the wrong memo, don't worry, just tap on another one (or tap the sameone again to "unhighlight" it. Of course, after you print one memo, youcan select another memo to print. When you're done, tap the Done button toreturn to the main screen.
There are a few special features of the memo screen. First, you'll see a Showbutton, which displays the first 1024 characters of the memo, so if you can't tellwhich memo you want to print from just the first line (which is all that is displayed),tap the Show button (note that the memo is not editable in this mode; to modifyyour memo, you must use the Palm Memo Pad application). Second, the memo display,unlike the display in the normal Palm Memo Pad application, skips over leading blanklines and blank spaces. This allows you to use PalmPrint to do such thingsas have a memo configured to print on letterhead paper, spaced down several linesto skip over the preprinted address, but still allows you to identify the memo inthe display (instead of just seeing a blank line).
PalmPrint is written to be printer independent, so that if you have somethingthat you print on one type of printer, you can switch to another type of printerand still get the same output. As a result of this, however, PalmPrint doesn'ttake advantage of some of the special features built into particular printers, whichare usually accessed using special non-printing "control codes" (sometimescalled "Escape sequences"). If you are willing to sacrifice printer independence,PalmPrint lets you embed these special codes directly into your memos, lettingyou change font size, switch to bold or italics, print a barcode, or a myriad ofother things.
The heart of this special notation are pairs of double angle brackets - "double-lessthan" symbols and "double-greater than" symbols, surrounding one tothree digits which are the numeric value of the control code - <<27>>,<<18>>,etc. These special symbols ARE found on the built-in keyboard of the Palm, but theyhave no Graffiti equivalent, so to create a memo containing these symbols, you'llneed to use the built-in (pop-up) keyboard (or download them from the desktop). Onceyou do this once, doing it the second time can be done most simply by copying fromthe first memo and pasting into a new one. Note carefully: in this manual,we represent these symbols by two separate one-character symbols (e.g., "lessthan, less than") because many web browsers don't display these special charactersproperly. But the proper character to use are SINGLE characters (characters 171and187 respectively for those with an interest in the details), which are found in thelower right corner of the "Int'l" portion of the popup keyboard on thePalm.
As a simple example, "ESC"-W-1 turns on a special "double-wide"mode on a Canon printer, and "ESC"-W-0 turns it off. So the following memowould print with a special "headline" at the top (27 is the numeric valueof the ESC character):
<<27>>W1 This is the headline
<<27>>W0And the normal text is starting here
If you want to make a note to yourself of what you are doing with the controlcodes, you can take advantage of this special feature - if the material enclosedbetween the double angle brackets is non-numeric, it is taken as a comment and simplyignored. Since the first line of a memo is what shows on the list of memos, you canuse this feature to make a note of the relevance of the memo which follows. The followingexample would produce the same output as the example above:
<<Memo with headline>><<27>>W1 This is the headline
<<27>>W0And the normal text is starting here
Tapping on ToDo List from the main PalmPrint screen pops up a smallwindow which looks like this:
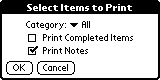
First select the category of items to be printed, or select All to print all ToDoitems. If you want to print items which have been marked as completed, check thebox, otherwise those items will be omitted from the output. Also check whether youwant any notes attached to your ToDo items to be printed (or not). Tap on OKto actually print the ToDo list, or Cancel if you change your mind. The printoutincludes the ToDo item itself, any Note which is attached to the ToDo item (optional),the Category of the ToDo item, the Priority, and the Due Date (if one is present).
Tapping on Address from the main PalmPrint screen will display thisscreen (assuming that you installed the companion program PalmPrint_Address;if you did not, you will be told that you need to do so to print information fromthe Address Book):
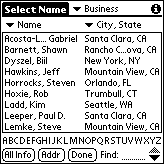
This screen in similar, but not identical to, the standard Address Book screen.On the top line is the Category selector, as in the Address Book. But on the topof the two columns of information, there are two pop-up lists, which display a varietyof choices:
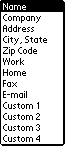
These choices are there for two reasons. First, by letting you select the typeof information displayed, you can choose the information which lets you recognizethe name and address you are looking for most easily. And second, the heading inthe first column is used in conjunction with the Find feature on the bottom of thescreen to limit the choices. So if, from the sample screen shown above, you set thefirst column selector to Name and then tap the letter "H" below the listof names (or use Graffiti to enter "H"), the screen will now look likethis:
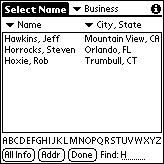
Of course you can continue; tapping "O" at this point would displayonly names starting with "HO", and so on. But if the first column wereset to Company, then tapping H will display those names where the company startswith the letter H, rather than the name. Note that the Address Book itself can onlybe sorted in two ways (by name or by company). If the column 1 heading does not matchthe Address Book sorting, then the names shown in this list will not be in alphabeticalorder, but you can still use the Find feature to find names starting with the letterof interest.
Once you locate the name you are looking for, tap on it once to highlight it (itwill turn into a "reverse video", white letters on black background, toindicate that). Now you have three choices - tap on it a second time to popup a windowshowing you the full details of that name, tap on All Info to print out allthe known information about that name, or tap on Addr to print out the nameand address (suitable for labels or envelopes).
There is one more setting, contained in the Envelope/Label menu you'llsee when you tap the Palm Menu button. This menu will display a screen allowing youto configures envelopes or mailing label printouts:
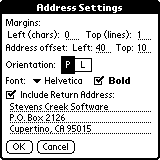
The left and top margins are straightforward. There are also left and top marginsettings in the main part of PalmPrint (described above), but often when printingenvelopes or labels you'll want different settings (you might need to print closerto the edge of the envelope, for example) so this screen lets you enter settingsindependent of the standard settings. In addition, if you are printing envelopes,the address will often be further offset by a certain amount both horizontally andvertically; the Address offset settings let you configure that position. Orientationis self-explanatory, but as explained above, this only applies on certain printers(PostScript and PCL printers). Font is also self-explanatory; again, thissetting lets you choose a standard font for envelopes or labels which differs fromthe standard choice in the rest of PalmPrint (note that when you print AllInfo, Courier font is always chosen so that things will line up nicely). Andfinally, for printing your envelopes, you can specify a return address to be printed.
In the Settings Menu you will also find another menu choice: TemporaryAddress. Select this when you want to print an envelope for a name/address whichis NOT in your Palm Address Book. Just enter the name in the box which appears andtap Print.
This application lets you print just a single name/address at one time. If youhave more complex needs, such as the need to print entire sheets of mailing labels,print phone lists, manage mailing lists, or even perform mail merge operations, wehave another application, SnailMailer, which includes those features (SnailMaileris sold separately).
Tapping on Schedule from the main PalmPrint screen displays thisscreen which lets you print parts of your schedule taken from the Palm DateBook application:
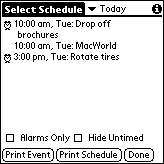
In the upper right is the schedule selector, which offers you these choices:
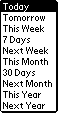
Choose the period of time for which you want to print your schedule; note thatwhatever you pick, the software will only print events starting with today, neverpast events (you can always do that from your Palm desktop software). Tap on PrintSchedule to print the entire schedule for the selected period, or tap on an eventto highlight it and then tap on Print Event to print just that event (tappingon a highlighted event a second time will display the full details of that eventon screen).
The two check boxes on the bottom of the screen, Alarms Only and HideUntimed, let you limit the events which are displayed (and printed).
The very last button on the main PalmPrint screen is labelled Other,which will show you a list of other possibilities for printing. The only fixed choiceon this list is Test Page. If you select Test Page from the list andthen tap Other, a test page showing you the different fonts and font sizesavailable will print out.
Other applications may appear in the popup list next to the Other button,depending on which of the optional "plug-in" modules for PalmPrintare installed in your Palm. As of this writing, there are four other released plug-ins:PalmPrint_Mail.prc, PalmPrint_Eudora.prc, and PalmPrint_iMessenger.prc,for printing from the Palm Mail, Eudora, and Palm VII iMessenger applications, respectively,and PalmPrint_Expense.prc, for printing from the Palm Expense application.If either of these are installed in your Palm, you will see an item or items in thepopup list reading Email (Mail), Email (Eudora), Email (iMessenger),and/or Expenses. Note that several other email applications, including OneTouchMail, MultiMail Pro, and others, have built-in support for printing via PalmPrint,so for those applications, you simply go to that application, and use the Print buttonor menu found in that application in order to print (read the manual of those productsfor more information about this).
Selecting Email (Mail), Email (Eudora), or Email (iMessenger)and then tapping Other brings you to this screen:
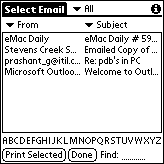
A list of your emails is displayed; you can select the category (InBox, OutBox,etc.) on the top line to display just the ones of interest. There are two columns;at the top of each column is a popup list that lets you select what is displayedin that column:

(Note that "Date" does not appear in the iMessenger screen). The firstcolumn heading is more important, because you can use it in conjunction with the"Find" feature on the bottom of the screen (and the series of letters belowthe email list) to limit the emails to those in which the selected information (exceptfor the date, of course) starts with the letter or letters in the Find field.Thustapping "M" will display only emails from someone whose name starts with"M" if the first column is a From field; if the first column is a Subjectfield, it will display only those emails whose subject starts with "M".
Once you have selected an email by tapping on it, you can tap again to displayits full information on screen, or tap Print Selected to print it. Tap Doneto return to the main PalmPrint screen.
Selecting Expenses from the popup list and then tapping Other bringsyou to this screen, showing a listing your expenses:
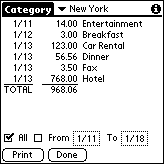
On the top line, you can select a category for a particular business trip, whichis how the Expense application groups expenses. On the bottom of the screen, youcan check All to show all expenses in that category, or check the Frombox and set starting and ending dates for the expenses that you want to display (andprint) and then tap Print to print out the expense report. You can also tapon any item to highlight it, and then tap again to display a screen showing the detailsof that expense (all the details which you recorded will appear on the printout).
The "Doc" file format is a popular format on the Palm; thousands ofdocuments are available to read on your Palm in this format, and several programsare available on the desktop to convert Microsoft Word and other files into thisformat for downloading and viewing on your Palm. To view and print files in thisformat, select Doc Files from the popup list and then tap Other. Youwill then see a screen showing you all Doc files which have been found in your Palm:
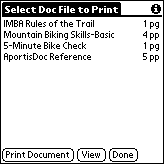
You see displayed the name of each document, and the approximate lengthof the file in printed pages. The length is approximate, because without actuallyprinting the document, it's impossible to know how many short or even blank linesare contained in the document. A file containing 50 characters, for example, couldall print on a single line, or it could contain 50 "return" charactersand thus take 50 lines to print.
To select a document, just tap on it, which will highlight the name. At this pointyou can tap Print Document to print the entire document, or either tap theView button or simply double-tap the name of the document to view it on adifferent screen:
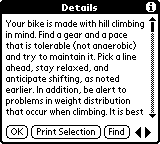
Doc files are divided into sections, and the PalmPrint_Doc program displaysone section (more or less) at a time. You can scroll within a section with the scrollbar on the right edge of the screen, or move from section to section with the leftand right arrows in the lower right-hand corner of the screen. Tapping on PrintSelection will print the entire section. Alternatively, you can first drag acrossa section of text (if you drag off the bottom or top of the screen, the screen willscroll continuously until you stop) to select it (the selected text will be highlighted).Now tapping Print Selection will print only the selected text, which allowsyou to print chunks of the document in question without worrying about exceedingthe Palm's clipboard limit (1000 using the standard PalmOS).
If you are looking for a specific piece of text, tap Find and you'll geta chance to enter some text to find:
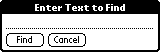
Enter the text, which is case-sensitive, and tap Find (or Cancel).If you want to find the same text again, just tap Find on the main Detailsscreen, then Find again on the Enter Text screen, and you'll see thenext occurance of the string, or get a warning beep if the string is not found. Searcheswill occur across the entire document, not just within sections.Searches are alwaysdone in the forward direction.
Doc files can have "bookmarks," which are often written into the textas "(bm)" or similar strings. Some Doc viewer programs display these bookmarksymbols on-screen, which seems silly since they are not really part of the text itself.PalmPrint_Doc does not display (or print) these bookmarks symbols.
Although it is not intended to be a "full-featured" Doc file viewer(like QuickWord or Documents to Go), you may find that it is perfectly suitable foryour needs, and that you don't need a separate Doc viewer program on your Palm. Ifso, there's one more feature you need, which is the ability to delete Doc files whichhave been downloaded into your Palm. On the main screen of PalmPrint_Doc,you'll find a single menu item: Delete. If you highlight a file by tappingon it, selecting the Delete menu will delete that file from your Palm (thereis no "are you sure?" warning, since even if you select this by mistake,which seems highly unlikely, you can always download the file again from your desktop).
For applications which don't support PalmPrint, you may still be able touse the "Clipboard" to select text to be printed with PalmPrint.Information is put on the Clipboard by other applications, using either the Copyor Cut functions in the Edit Menu of that application. You'll findthese menu choices in all the built-in Palm applications, as well as a wide varietyof other applications available for the Palm.Tapping on Clipboard from themain PalmPrint screen prints the current contents of the Clipboard.
When you print, the lower portion of the screen will display a small "statuswindow" which lets you know what's happening. This is particularly valuablefor IrDA printing, since you'll want to know if the transmission is occuring, andwhen it's done, so watch the screen and see what it says (you need to keep pointingthe Palm at the printer while it is transmitting data!). There is a Cancelbutton in this window; if something goes wrong, or for some reason you want to abortthe printout, just tap on Cancel (under some conditions you may have to holdthe stylus down on the Cancel button for a few seconds; it does not alwaysrespond instantaneously like most buttons on the Palm).
PalmPrint was written to allow other applications running on your Palmto use it to do the printing for them. For example, our TakeAn Order! software is one such application, which lets you do business inthe field, taking orders (or preparing quotations) and printing receipts (or estimates)on the spot. SnailMaileris another, which does mailing list management, mail merge, and more. To print ortransmit data from such applications, you will usually find a menu item or a buttonin that application which will send the information (transparently to you) to PalmPrintfor printing or transmission. You won't interact with PalmPrint directly inthis case. However, before using the other application to print for the first time,you must use PalmPrint itself and configure it properly (as discussed in
You'll find a current list of applications which support printing via PalmPrintat http://www.stevenscreek.com/palm/palmprintapps.html.
If another application doesn't support PalmPrint, then you may be ableto use the Print Clipboard function described above to print information fromthat application. You might also want to write to the application's developer, andencourage them to support PalmPrint.![]()
If you don't have infrared capability, one of the most difficult aspects of usingPalmPrint for most people is getting the hardware configured properly. MostPalms have a serial connector, and most printers have parallel input (serial connectionssend one bit of information at a time, while parallel connections send eight bitsof information at once using a larger number of wires). If your PalmOS handheld unitdoes NOT have a serial output, you will only be able to print via infrared. If yourhandheld unit has a combination serial/USB connector (e.g., Handspring Visor), youMAY be able to print via cable, as described below.
If you have a printer which accepts serial input, the connector on theprinter will often be a "DB-25 female" connector. This is a long connector,slightly wider on one side than the other, with 13 holes on the wider side and 12on the other side. To plug into this connector you need a DB-25 male cable. The standardoutput from the Palm, whether the Palm is in the cradle or you are using the "HotSynccable" available from 3Com, is a DB-9 female (9 holes, 5 on the slightly widerside, 4 on the other) connector. For this situation, you will need a DB-9 male toDB-25 male cable, an item you can find in most computer or electronics stores orcatalogs and at one time included standard with Palm devices.
With most printers, the "polarity" of the connection may be wrong. Ifyou see no response from your printer whatsoever, it is likely that you need a "nullmodem" device (which swaps two of the lines on the input) or else a null modemcable. You can find inexpensive 9-pin or 25-pin null modems at most computer andelectronics stores; Mark/Space (www.markspace.com) sells null modem serial cables(also simply called modem cables) to connect to a variety of Palm handheld units(including the Palm III, Palm V, and Handspring Visor).
Note that if you have a Handspring Visor and a serial cradle, you can connect thecradle cable (usually via a null modem) to the input of a serial printer and printer.If you have a USB cradle, you cannot do this.
If you have a printer which accepts parallel input, the connector on theprinter will almost always be a "Centronics" connector. Note that you cannotsimply connect a cable such as a DB-9 male to Centronics between your Palm and yourprinter. Cables like that are made to take the parallel output of a PC (usually availableon a DB-25 connector but sometimes on DB-9) to the parallel input of your printer.You must instead have a "serial to parallel converter", which is a morecomplex (and more expensive) device which converts the serial output of the Palmto a parallel signal which can be accepted by your printer. Stevens Creek Softwaresells two such cables, one which attaches directly to a Palm III or Palm VII, anda second which attaches to a 9-pin female serial connector which is the type foundon the end of a serial HotSync cradle or HotSync cable. Visit the PalmPrintweb page for details.
If your printer manual describes the connector as a "bi-directional"parallel cable, chances are very good you will NOT be able to use a serial-to-parallelconverter cable, which seem in almost all cases to be incompatible with the bidirectionalparallel printers.
Note that if you have a Handspring Visor and a serial cradle, you CANNOT connectthe cradle cable to the serial to parallel converter cable (and then to the printer).If you want to print to a parallel printer, you must have not only the serial toparallel converter cable mentioned above, but also a special Handspring serial cable(the DCH-H9) sold by Mark/Space (www.markspace.com).
If you have a printer which accepts USB input, this is of no use, evenif you have a Palm handheld that is also a USB device. USB is a "master-slave"connector, and both printers and Palm handhelds are configured as "slaves."You cannot connect two slaves together via USB, so you will not be able to printto a USB printer.
There are also several "infrared to parallel" adapters on the marketwhich essentially add an infrared (IrDA) port to your printer by attaching to theexisting parallel port. Unlike the serial to parallel printer adapter cables, infraredto parallel adapters seem to work on all parallel printers, regardless of whetherthey are "bidirectional" parallel printers or not. We have tested the following:
Of these, the Psion is battery powered making it fully mobile (but of course thisprovides the disadvantage that the batteries may go dead without you realizing it);the others come with AC adapters and must be plugged in. The Actisys has the advantageof having a "passthrough" port so that a computer can remain connectedto the parallel port at the same time; the Psion replaces the printer connection.
See http://www.stevenscreek.com/palm/palmprintconnectivity.htmlfor the latest updates.
There are also several "Bluetooth to parallel" adapters on the marketwhich essentially add a Bluetooth port to your printer by attaching to the existingparallel port. We have tested the following:
All three of these are "powered" adapters (that is, they come with anAC adapter and must be plugged in), and none, unfortunately, comes with a "passthrough"port allowing your computer to remain connected to the parallel port of the printer.The Epson works, as far as we can determine, ONLY with Epson printers; the Troy andthe MPI (HP) work with all types of printers that we have tested. Of these, the MPIhas the advantage that it identifies the printer to which it is attached, which meansthat PalmPrint can automatically switch to the appropriate printer language(HP/PCL, Epson, etc.) depending on the printer which it detects. The Troy identifiesitself only by its generic name ("XCD"), which means that you need to selectthe printer type in PalmPrint manually. If you only print to one printer,of course, this will make little difference.
See http://www.stevenscreek.com/palm/palmprintconnectivity.htmlfor the latest updates.
To transmit data to a computer, the connector which you use to performa HotSync is the proper connector. The only "trick" here is that you mustfirst turn off HotSync on your desktop computer, because you are going to establisha connection between your Palm and your computer which bypasses the standard HotSyncsoftware. Of course, you won't need this trick if you are transmitting informationto a computer which is not running HotSync at all. Once you turn off HotSync (ifnecessary), start your terminal emulation software (whether standalone, or the Communicationsmodule of a "works" program such as ClarisWorks), configure the connectionsettings (primarily the baud rate) within your desktop software, and make sure toselect the button or menu item which opens the connection between the terminal emulationsoftware and the serial port of your computer (it is usually not opened automatically).Some step-by-step examples follow for software commonly available:
If you have Windows 98, here are complete instructions for transferring informationfrom your Palm to your desktop computer, using the HyperTerminal application whichis included with Windows 98:
If you have Windows 95, here are complete instructions for transferring informationfrom your Palm to your desktop computer, using the HyperTerminal application whichis included with Windows 95:
If you have Windows 3.1, here are complete instructions for transferring informationfrom your Palm to your desktop computer, using the Terminal application which isincluded with Windows 3.1:
The Mac doesn't come with any standard terminal emulation software, but AppleWorks(formerly ClarisWorks) is probably the most popular program which includes a Communicationsmodule. Here are complete instructions for transferring information from your Palmto your Mac using AppleWorks:
PalmPrint can also be used to transfer data from the Palm to a WindowsCEhandheld computer. Unlike when you connect to a desktop computer, where the samecabling you use for HotSync'ing is appropriate, when you connect to a WindowsCE computeryou'll need a null modem device of some type. We have connected the two with thefollowing setup: a DB-9 male to DB-25 male cable, a DB-25 null modem, and the DB-25female to DB-9 male adapter which comes with the Palm. No doubt simpler connectionsare possible. Once the connection is made:
Copyright 1997-2002 by
All Rights Reserved
PalmPrint is a registered trademark of Palm, Inc., used by Stevens Creek SoftwareLLC under express license.