ZLauncher User Manual
|
|
ZLauncher User Manual | English | |
| Chinese GB | |||
| Chinese BIG5 |
Thank you for using ZLauncher, we strongly recommend you reading the following
items before taking ZLauncher into use:
Please feel free to visit our web site(http://www.zztechs.com) to get the latest news on our products.
ZLauncher is a powerful system management program that integrates the system supervisor, application/database manager and expansion card manager. It is more than a standard launcher:
Hardware: Handheld device which runs on PalmOS 3.5 or higher (except HandEra330 presently). Memory: At least 300K of free memory.
Before installing ZLauncher, please be sure you've installed Palm Desktop software. If not, please read the item on "Palm Desktop" in the reference for the handheld device.
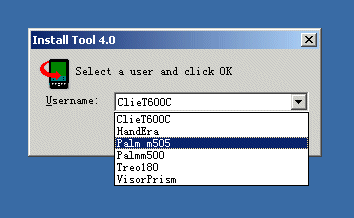
- Download ZLauncher(ZIP file) from our web site: http://www.zztechs.com.
- Extract ZLauncher.prc from the ZIP file.
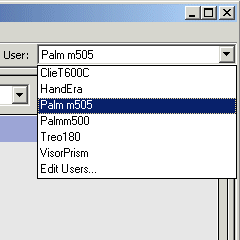
- Double click ZLauncher.prc. Then select the Palm user name.
Click OK button:
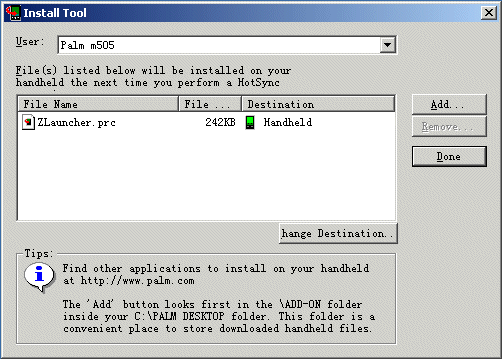
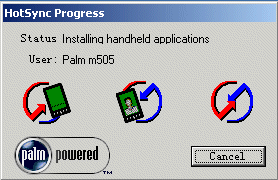
- Press the HotSync button on the HotSync cradle, and synchronize ZLauncher to the handheld.
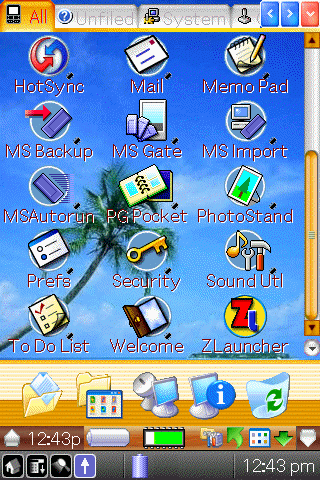
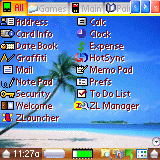
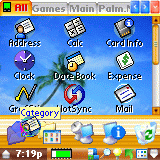
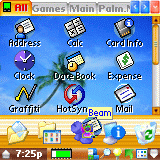
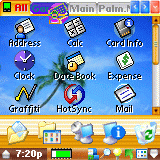
ZLauncher provides most flexibility for different users. You can organize applications/databases/files of the handheld in tab mode, or in the classical compact mode.
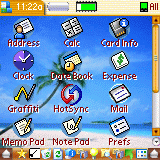
Compact:
Compact mode provides the similar user inferface as the system launcher, plus more feature buttons available on the bottom bar.
You can change the UI mode in the ZL Preferences form. ZLauncher provides 3 views for diaplying icons: Icon View, List View or Detail View. List View:
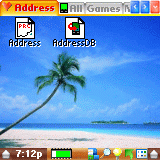
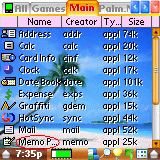
List view is similar to the system Launcher, it displays small icons and the icons are sorted by name.
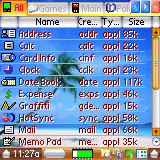
Detail View:
Each row of Detail View matches a corresponding item. Under the view, all icons can be reordered by a certain information by tapping the column button.
Category Tab Title Tap the tab title to activate the corresponding category, and you will see the icons under the category. Previous Tab Button Tap the button to activate the previous tab. Next Tab Button Tap the button to activate the next tab. Tab List Button Tap the button to pop up the category list. Select a item of the list to activate the corresponding tab. Scroll Bar If the screen is not enough to display all icons, you can use the scroll bar to scroll the screen and display the rest icons. PageUp and PageDown buttons are also available for this purpose. Bottom Bar Toggle Button Tapping this button will toggle the bottom bar.
Column Title Button By tapping the corresponding button in Detail View, you can resort the icons, and the new order is available in Icon View and List View. You also can adjust each column width by changing the width of the corresponding button.
Tools / Control Panel Toggle Button Used to toggle the popup Tools / Control Panel. DateTime Button Display the current system time. Tapping on the button will display the current system date. Tap the button to change to cycle displaying Time/Date/Day of Week. If you don't want to show this button, just uncheck the box of "Time" in the Top&Bottom Bar Setup form.
Battery Info Button Display battery voltage in 10 levels. Tapping on the button will display the battery voltage and percentage of the power remaining. Tap the button to change to cycle displaying Graphic/Voltage/Percentage of the remaining power. If you don't want to show this button, just uncheck the box of "Battery" in the Top&Bottom Bar Setup form.
Memory Info Button Display free memory in 10 levels. Tapping on the button will indicate the free memory. Tap the button to change to cycle displaying Graphic/Megabytes/Percentage of the free internal memory. If you don't want to show this button, just uncheck the box of "Memory" in the Top&Bottom Bar Setup form.
- If the percentage of free memory is over 50%, the chip is displayed in green.
- If the percentage of free memory is between 30% and 50%, the chip is displayed in yellow.
- If the percentage of free memory is under 30%, the chip is displayed in red.
Expansion Card Info Button Display the free space of the first expansion card. Tapping on the button will indicate the free memory. Tap the button to change to cycle displaying Megabytes/Percentage of the free space. If you don't want to show this button, just uncheck the box of "Exp.Card" in the Top&Bottom Bar Setup form.
Fullscreen Toggle Button Tapping the button can toggle the Virtual Graffiti area. If you don't want to show this button, just uncheck the box of "Fullscreen" in the Top&Bottom Bar Setup form. (Only available on Sony Clie NR/NX series handhelds).
Menu Button Used to call up the system menu. Category Label Button Display the current category. Tapping on the button will pop up the category list.
Popup Panel
Pop-up Panel can make full use of the limited display room, and it is easy to use. You can show or hide the panels at your will.
There are 3 types of pop-up Panels: Memory Tools Panel, Expansion Card Tools Panel and Control Panel.
- Memory Tools Panel:
Memory Tools Panel appears only if the active tab is an application tab or a specific tab.
Application Categorizing Button Change the category of the application / launchable database. New Tab Button Create a new tab. Beaming Application/Database Button Beam applications/databases. Viewing Information Button View information of system or applications/databases. Trash Bin Button Store or direct delete useless applications/databases.
- Expansion Card Tools Panel:
Expansion card tools panel appears only if the active tab is an expansion card tab.
Create Back Image / Create ShortCut Button Drag a picture file to the button to convert it into a background image, and set it as the current one.
Drag an application file to the button to create a short cut database for the file.Creating Directory Button Create new directory on the current path. Copying File Button Copy files to the specified location. Moving File Button Move files to the specified location. Beaming File Button Beam files from the expansion card. Viewing File Info Button View information of system or files/directories. Deleting File Button Delete files/directories. Changing Path Button Turn to a specified location, and the new path will display on the button.
- Control Panel:
Preferences Button Call up the Preferences form. Display Setup Button Call up the Display Setup form. Color Setup Button Call up the Color Setup form. Dialog Setup Button Call up the Dialog Setup form.
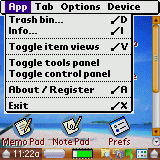
View contents of trash bin. The menu shortcut to is "D". View the system information. The menu shortcut is "I". Toggle the current view among Icon View, List View and Detail View. The menu shortcut is "V". Show or hide the Tools Panel Show or hide the Control Panel Call up the About ZLauncher form. You can call up the Register form by tapping the Register now button at right-bottom corner, and register your copy of ZLauncher. The menu shortcut is "A". Exit to the system launcher, and set the system launcher as default launcher. If the option of "Default launcher" in the ZL Preferences form is checked, when the handheld soft reset, it'll set ZLauncher as the default launcher automatically. The menu shortcut is "X"
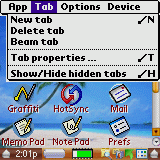
Create a new tab. The menu shortcut is "N". Delete the active tab. This operation only operates on the tab, not on the applications/databases/files of the tab. Beam all visible applications/databases or files in the active tab. If the active tab contains application, it will be beamed with the Beaming Application Rules . The menu shortcut is "B". View the properties of the active tab. The menu shortcut is "T". Show/Hide hidden tabs: Show or hide the tabs those whom are marked Hidden. The menu shortcut is "H".
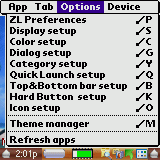
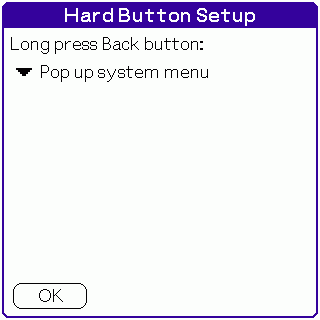
Call up the ZL Preferences form. More details about Preferences please refer to the section . Call up the Display Setup form. The menu shortcut is "S" Call up the Color Setup form. The menu shortcut is "C". Call up the Dialog Setup form. The menu shortcut is "G". Call up the Category Setup form. The menu shortcut is "Y". Quick Launch setup: Call up the Quick Launch Setup form. The menu shortcut is "Q". Top&Bottom bar setup: Call up theTop&Bottom Bar Setup form. The menu shortcut is "B". Hard Button setup: Call up the Hard Button Setup form. The menu shortcut is "K". Icon setup: Call up the Icon Setup form. The menu shortcut is "O". Theme Manager: Go to the Theme Manager. The menu shortcut is "M". Refresh apps: Manually refresh the application information cache database. It also will scan the /Palm/Launcher/ directory, and create the Virtual ShortCuts for the applications in the directory automatically.
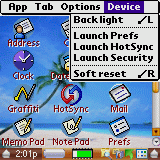
Adjust the brightness of the screen. It will toggle the backlight on some handheld models such as Palm m505. The menu shortcut is "L". Launch Prefs application.. Launch HotSync application.. Launch Security application.. Reset the handheld. Once reseting the handled, the last preferences will not be saved. The menu shortcut is "R".
UI Mode: Select the UI mode between Tab mode and Compact Mode. Display the hidden items by checking the box. Enable hints by checking the box. Display the hidden tabs by checking the box. Checking the box will enable cycling switching tabs. Always activate the first tab when ZLauncher starts. Set ZLauncher as the default launcher or not.
If the option is on, ZLauncher will be the default launcher even after a soft reset. Tapping on the "App" button will activate the next tab, otherwise, tapping on the "App" button will exit ZLauncher.If there is no more icons to be scrolled, pressing PageUp or PageDown button will activate the previous or the next tab. This feature is also available for JogDial, RockerSwitch and 5-Way navigator. If you check this option, every time ZLauncher starts, it will scan the /Palm/Launcher/ directory, and make Virtual ShortCuts for the applications in the directory automatically. When the expansion card is removed, ZL will delete all Virtual ShortCuts automatically, and recreate the Virtual ShortCuts if the expansion card is inserted again.
NOTE: If you check this option, it will slow down the start of ZLauncher heavily. You can uncheck this option, and refresh the applications cache database manually when the files in the directory is modified.Check the box to enable the Fast Find function. You can set the highlight period with the slider bar on the right hand side. Set the period of tap and hold to pop up anoperating menu.
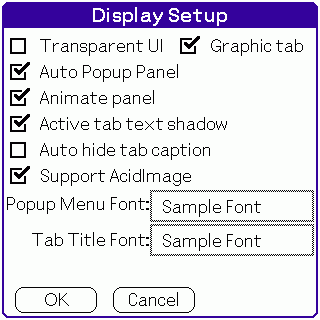
If this box is checked, and the background image is enabled, most of the UI will be transparent and shows most of the background image. If this box is checked, the tab title will be displayed with graphic image, Otherwise, only the frame of the tab title will be drawn and the tab will be transparent. Check this box to enable the text shadow of the active tab caption. If this box is checked, when you drag an icon or the tab to the last row of the icons, the Tools Panel will pop up automatically. Animation show / hide panel. Checking the box will slow down the display speed. Hide the caption of all inactive tabs, and only display the caption of the active tab. Support for viewing images with AcidImage. If this box is checked, when you tap on a BMP/JPG/GIF file, ZLauncher will launch AcidImage and AcidImage will open the image file automatically. This feature requires AcidImage 2.4n or higher version. Select the font of Popup Menu. Select the font of tab titles. If you are using the Compact UI mode, this font setting is also avaiable for the Category Lable button.
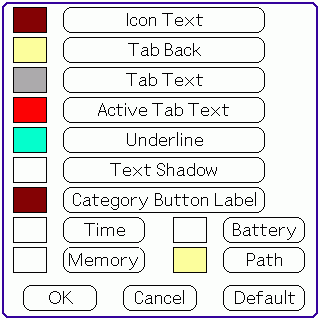
Select icon text color. Select tab back color. Select tab title text color . Select the active tab title text color. Select the color of underline in the Detail View. Select icon text shadow color. Select the text color of the Category Label button. Select the text color of the DateTime button. Select the text color of the Battery button Select the text color of the Memory button. Select the text color of the Path button. Restore the default color settings.
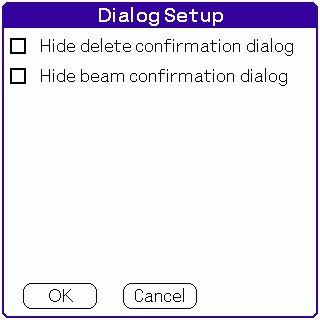
Check the box if you do not want to see the Deleting Confirmation Dialog when you delete applications/databases, and the deleting operation will follow current Deleting Rules. Check the box if you do not want to see the Beaming Confirmation Dialog when you beam applications, and the deleting operation will follow current Beaming Rules
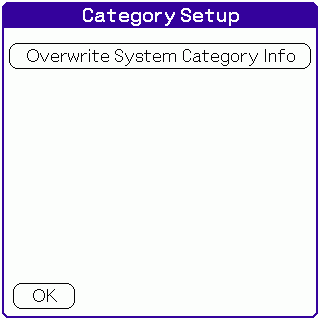
Once you tap this button, ZLauncher will overwrite the category information of the system with the ZLauncher's.
If you want to uninstall ZLauncher, and want to keep the category information, you can overwrite the system's category information first, then uninstall ZLauncher.
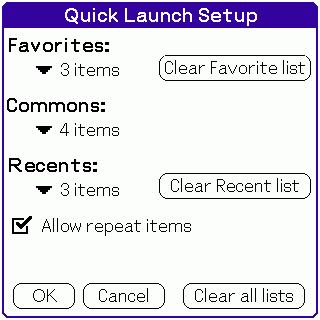
Quick Launch+ list provides a way for you to launch your favorite applications quickly.
Quick Launch+ list is made up of Favorites List, Commons List and Recents List.
To set an application as your favorites, just simply drag the application to the QuickLaunch Button, then it will be added to the Favorites list as your favorite application.
Setup the number of items in the Favorites list. Remove all items from the Favorites list. Setup the number of items in the Commons list. Setup the number of items in the Recents list. Remove all items from the Recents list. Remove all items from the Quick Launch list. If you uncheck this box, it only allows a item appearing once at one time. Remove all items from the Quick Launch list.
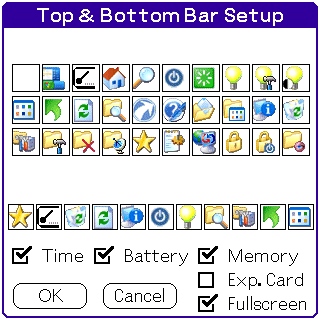
You can easily customize the top bar and the bottom bar with Top & Bottom Bar Setup. The top bar is only available if you are using Compact UI mode.
To setup the bottom bar, just simply drag the button from the Buttons List to the lower Buttons Row. Every square on the Button row is corresponding to a button on the bottom bar. If you set the button to a empty square, then the corresponding area of the bottom will be empty.
Time: If this box is checked, the DateTime button will be available on the Bottom Bar(in Tab UI mode) or on the Top Bar(in the Compact UI mode). Battery: If this box is checked, the Battery button will be available on the Bottom Bar(in Tab UI mode) or on the Top Bar(in the Compact UI mode). Memory: If this box is checked, the Memory button will be available on the Bottom Bar(in Tab UI mode) or on the Top Bar(in the Compact UI mode). Exp. Card: If this box is checked, the Exp. Card button will be available on the Bottom Bar(in Tab UI mode) or on the Top Bar(in the Compact UI mode). Fullscreen: If this box is checked, the Fullscreen toggle button will be available on the Bottom Bar. This option is only available on the Clie NR/NX/NZ series handhelds. Clear the button setting. Pop up the system menu. Open the menu command bar. Activate the next tab. If the option of "Default launch" in the ZL Preferences form is unchecked, tap on this button will exit ZLauncher. Pop up the Find dialog. Power off. Soft reset. Toggle the back light state. Popup the Brightness dialog. Popup the Contrast dialog. Toggle the views. Pop up the QuickLaunch+ list. Refresh the applications cache database. Pop up the Path Tree. Exit to the system launcher. Pop up the Graffiti Reference dialog. Categorize the applications. Create a new tab. View the information of the system or a certain application/database/file. Delete a certain application/database/file. Pop up the setups list. Call up the Tab Properties form. Delete the active tab. Beam all items on the active tab. Launch the application which is combined with the Silk-Calc button. Launch the Prefs application. Launch the HotSync application. Launch the Security application. Lock the handheld and power off. Show or hide the hidden tabs.
You can setup the function of long pressing the Back button of the JogDial or the Select button of the 5-Way Navigator.
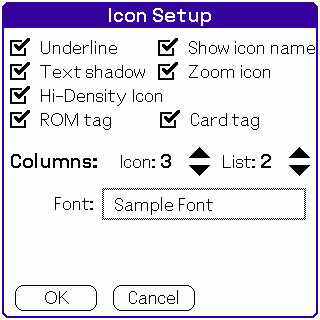
If this box is checked, it will display an underline for each row in Detail View. If this box is checked, it will display the name of each icon. If this box is checked, it will display the shadow of the icon text. If this box is checked, the icons will be displayed in the zoom(larger) mode.
This function is only available for HiRes and High-Density handhelds.If this box is checked, the High-Density support is enabled. Then it will display the High-Density version icon of the application even ZLauncher runs on PRE-PamlOS5 handheld. Display a chip tag for the ROM based item on the cornor of the icon by checking the box. Display a blue tag for the Card app on the cornor of the icon by checking the box. Setup the number of columns in Icon View and in List View. Select the icon text font.
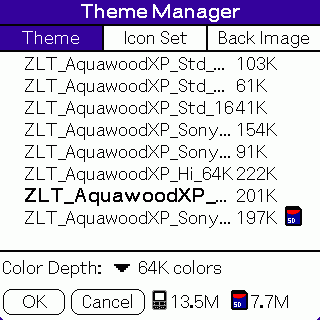
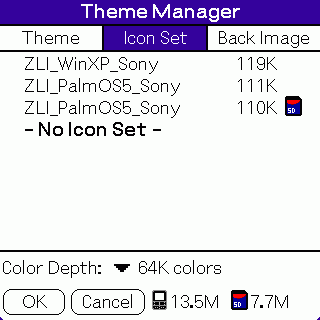
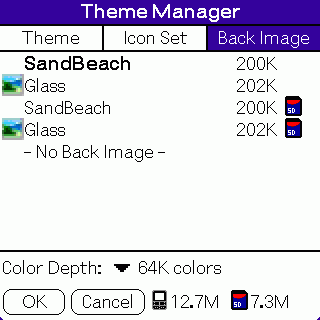
Theme Manager is a useful tool for managing themes, iconsets and background images. You can manager your themes, iconsets and background images easily and quickly. You can change the color depth with the Color Depth drop list. The Color Depth list is based on the selected theme and the display capability of the handheld.
Theme page lists all themes on the handheld. If the theme is stored on the expansion card, there is a expansion card icon following the theme name.
The path for storing themes is:
/Palm/Programs/ZLauncher/Theme/Once you open the theme page of the Theme Manager, ZLauncher will create the directory for storing themes automatically.
To manage the theme, first select the theme, then choose the operation from the popup Operating Dialog.
Iconset page lists all iconsets on the handheld. If the iconset is stored on the expansion card, there is a expansion card icon following the iconset name.
The path for storing iconsets is:
/Palm/Programs/ZLauncher/Iconsets/Once you open the iconset page of the Theme Manager, ZLauncher will create the directory for storing iconsets automatically.
To manage the iconset, first select the iconset, then choose the operation from the popup Operating Dialog.
BackImage page lists all background images on the handheld. If there's no icon leading the file name, this file is a converted background image database, otherwise, it's a picture file, and much be converted before using as background image. If the background image is stored on the expansion card, there is a expansion card icon following the background image name.
The path for storing background images is:
/Palm/Programs/ZLauncher/BackImage/Once you open the BackImage page of the Theme Manager, ZLauncher will create the directory for storing background images automatically.
To manage the background image, first select the background image, then choose the operation from the popup Operating Dialog.
NOTE: In-use database can not be modified or deleted. It means that you can not delete an in-use theme or overwite the in-use background image.
Launching applications in 3 ways:
- Select the application with stylus.
- Input the former part of the application's name to highlight it, then input a linefeed(Return) character to launch it.
- If the handheld contains a jog wheels, you also can use the jog wheels to select the application, and then press to launch it.
If an expansion card is inserted, you can launch any application on any location of the expansion card (If the application requires related databases, please be sure those related databases already exist in RAM before you launch the application).
In case of lots of applications have been installed on the handheld , it may cost a lot of time to find out a certain item. You can solve the problem simply with Fast Find.
To enable Fast Find, just check the check box of Fast Find in ZL Preferences. During the icon highlighted period, as long as you input icon name in order, it will find out the most matching icon automatically and highlight it. The inputted character can be letter or numeral, and it is case insensitive.For example: Launch Memo Pad application with Fast Find.
First enter letter "M":
Then enter letter "E":
Finally the icon of Memo Pad appears and has been highlighted. Now you can launch it with entering a linefeed character (strike from the top-right corner to the left-bottom corner in the left part of writing area with your stylus, or just press the return key if a keyboard is presented.)
ZLauncher offers a good support for JogDial:
Double pressing the Back button can pop up the category list. Long pressing will perform an operation, which is set in the Hard Button setup. If there is no highlighted item, releasing the JogDial will activate the next tab.
If an item is highlighted then releasing the JogDial will launch the item.Scroll Up: Highlight the previous item. Scroll Down: Highlight the next item. Pushed Up: Scroll up one page of the current items. Scroll down one page of the current items.
ZLauncher offers a good support for 5-Way Navigator:
If there is no highlighted item, pressing the Select button will activate the first icon of the screen.
If an item is highlighted then pressing the Select button will launch the item.Up: If there is no highlighted item, pressing the Up button will scroll up one page.
If an item is highlighted, pressing the Up button will activate the upper item.Down: If there is no highlighted item, pressing the Down button will scroll up one page.
If an item is highlighted, pressing the Down button will activate the lower item.Left: If there is no highlighted item, pressing the Left button will switch to the previous page.
If an item is highlighted, pressing the Left button will activate the previous item. If the current active item is the first item, the current active item will be deactivated.If there is no highlighted item, pressing the Right button will switch to the next page.
If an item is highlighted, pressing the Right button will activate the next item.
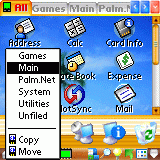
There are 3 types of category in ZLauncher: Application category, specific category and expansion card category.
- Application tab only contains applications and launchable databases, similar to the system Launcher.
- Specific tab only contains non-application databases. The databases with same CreatorID/TypeID(or both) can be grouped as a category.
- Expansion card tab can be and only can be created by ZLauncher automatically. Each expansion card tab is corresponding to an expansion card inserted in the handheld.
Both Specific Category and Expansion Card Category are only available in ZLauncher, and do not exist in the system Launcher.
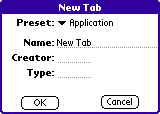
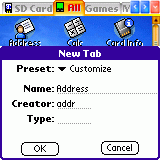
Tap the New Tab button, or select the menu command Options > New tab will Pop up the New Tab dialog.
Preset: The preset parameter of several common types of category. You can create a specific category quickly by choosing one of the presets.
Name: The name of the new category.
Creator and Type: If you specify neither Creator field nor Type field, the created category is an application category; If you specify one of the two fields, the created category is a specific category. So you can group the databases in memory with same CreatorID/TypeID( or both) as a new category by specifying the Creator field or the Type field. For example, the CreatorID of standard PalmOS document is REAd, and the TypeID is TEXt, By creating a specific category with CreatorID and TypeID mentioned above, you can view all standard PalmOS documents in a tab.
If you want to create a tab of an application's related databases in another way, you can drag the icon of the application to New Tab button, then the pop up dialog will be set up the corresponding parameters automatically. This function is also available for databases.For example: If you have bought a new handheld, and you wish to duplicate the data of Address on your old handheld to the new one, you can first drag the icon of Address application to Creating Tab Button, then select OK to create a new Address related specific tab, and then drag the icon of AddressDB to the Beam button to beam it to the new handheld via IR.
You can delete a category by dragging the corresponding tab title to Trash Bin/Delete File button; or delete the active tab directly by selecting the menu command Options > Delete tab. This operation only deletes tab, not the applications/databases/files in the tab. If the deleted category is an application tab, all applications in it will be moved to Unfiled category.
Only applications can be categorized. You can change the category of application in 3 ways:
- Drag the application to the Category button, then select the destine category from the pop up list of application categories:
- Drag the application icon to the destine tab title:
- Drag the application icon to Information button to call up the Application Information form, then select the new category from the application category list, finally tap the Apply button to confirm the operation.
Overwrite System Category Information:
Goto the "Category Setup" form, tap the button, then you can overwrite the category information of system with ZLauncher's.
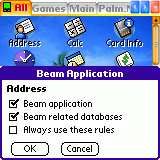
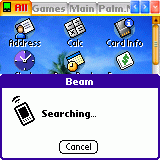
All databases/files can be beamed via IR. Just drag the database/file icon to Beam button and the database/file is beamed. If you are beaming an application, it will pop up a dialog to setup the beaming operation.
The application will be beamed if you check this box. The application related databases will be beamed if you check this box. Always use these rules:
Always use rules mentioned above. If you check the box, the dialog will not appear anymore, and when you beam an application, the beaming operation will follow the current rules. If you want the dialog to appear again before beaming a application, deselect the option of Hide beam confirmation dialog in Dialog Setup form.
Beaming Category: You can beam all visible items in the Tab by dragging the tab title to Beam button. If you want to beam invisible items, please show the hidden items first, then perform the operation mentioned above.
For example: You can duplicate all eBooks in one handheld to other one by beaming the eBooks category tab. You can create one as described in section Creating Category if the eBooks category dose not exist. If you don't want to beam all eBooks, hide the eBooks you don't want to beam before beaming, and restore them when the operation complete.
With the information function of ZLauncher, you can know you handheld better and make full use of it.
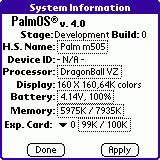
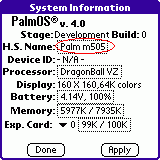
- Viewing System Information: Tap the Information button to view the system information.
- Viewing Application Information: Drag the application to the information button to view the application information.
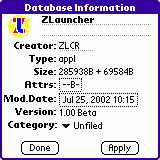
- Viewing Database Information: Drag the database to the information button to view the database information.
- Viewing Directory Information: Drag the directory to Information button to view directory information. Please be patient since this operation will search all sub-directories and files under the selected directory and it may be slow.
WARNING: Do NOT insert or remove the expansion card when it is busy to avoid any damage to it! - View File Information: Drag the file icon to the Information button to view file information.
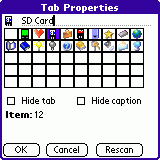
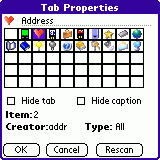
- Viewing Tab Properties: Drag the tab title to the information button to view the properties of the tab.
Application Tab Properties Form
Specific Tab Properties Form
Expansion Card Tab Properties Form
Hide tab: If this box is checked, this tab will be marked as hidden and will not be displayed if the box of "Show hidden tab" in the ZL Preferences form is unchecked.
.Hide caption: If this box is checked, this tab's caption will not be displayed. If the box of "Auto hide tab caption" in the ZL Preferences form is checked, this option will be ignored.
Note:
- You also can view the information of an item by tapping on its icon for one second, then select "Info..." from the popup menu.
- For expansion card tab, changing the tab name will also change the volume label of the corresponding expansion card.
- You can tap the Rescan button to rescan the icons in the tab.
Trash Bin in ZLauncher is similar to the Recycle Bin in MS Windows. You can archive the useless applications/databases in the trash bin, and recovered them if necessary( This feature isn't available for files/directories )
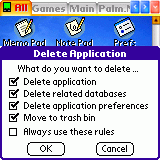
- Deleting Application: Drag the icon of deleted application to Trash Bin button, and the Deleting Confirmation Dialog appears.
The application will be deleted if you check this box. The related databases of the selected application will be deleted if you check this box. The preferences which saved in the system of the selected application will be deleted if you check this box. The selected items will be archived in the trash bin if you check the box, otherwise they will be deleted directly and cannot be recovered. Always use these rules:
Always use the rules mentioned above. If you check the box, the dialog will not appear anymore, and when you delete an application, the deleting operation will follow the current rules. If you wish the dialog appear again before deleting an application/a database, just deselect the option of Hide delete confirmation dialog in Dialog Setup form.
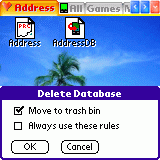
- Deleting Database: Drag the icon of deleted database to Trash Bin button, and the Deleting Confirmation Dialog appears.
Please refer to the section about Deleting Application for the meaning of the checkboxes .
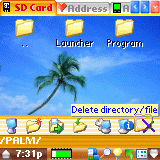
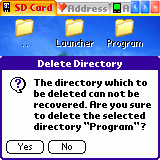
- Deleting File/Directory: Dragging file/directory to Delete File button can delete the specified file/directory. If the specified item is a directory, all sub-directories and files will be deleted together.
WARNING:
- Please make sure you want to delete the file, since the deleted file cannot be recovered!
- Do NOT insert or remove the expansion card when it is busy to avoid any damage to it!
Trash Bin:The items put into trash bin are not really deleted. They are just not available for ZLauncher You can deleted the useless items in Trash Bin to release memory, or recover them as you need.
NOTE: Trash Bin can only store applications/databases. Files/Directories put into Trash Bin will be deleted and can NOT be recovered.
This function is only available for the handheld presenting an expansion card.
The top item - Palm - means All category of the application categories
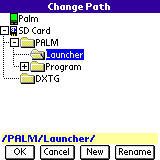
- Tapping the directory icon can enter the corresponding directory.
- Tapping the parent directory icon(which icon name is ". .") can back to the parent directory of the current one.
- Tapping the Change Path button will pop up the Path Tree, select the destination directory and select OK button will turn to the selected directory
New: Create a new directory on the selected location. Rename: Rename the selected directory. This function is only available for the handheld presenting an expansion card
- Tapping the Creating Directory button can create a new directory in current path
- Tapping the New button in path tree form can create a new directory in the selected path
- Copying File/Directory: Drag file/directory to Copy button can pop up the path tree. Then tap the OK button in path tree form and it will copy the specified file/directory to the destination path selected in path tree. If the destination expansion card is different from the source expansion card, you also can drag the file/directory to the destination tab title directly. All sub-directories and files will be copied if the source item is a directory.
- Exporting Application/Database: Dragging an application/database in memory to the tab title of destination expansion card can export it to the current path of the destination expansion card. You also can drag the item to Category Button, then select "Copy" from the pop up menu. Note, if there's few free internal memory, the import operation maybe very slow, even failure.
- Importing File: Drag the file to an application category tab title can import the selected file to memory. The imported file must be the standard PalmOS database(.PRC, .PDB or .PQA). If the imported file is an application, you can specified the category when you import it. In this case, dragging application to a tab title will categorize it to the corresponding category, or categorize the it to it's default category by dragging to the "All" tab title.
WARNING: Do NOT insert or remove the expansion card when it is busy to avoid any damage to it.
This function is only available for the handheld presenting an expansion card
- Drag file/directory to Move button can pop up the path tree. Tapping the OK button in path tree form will move the specified file/directory to the destination path selected in path tree. All sub-directories and files will be moved if the source item is a directory.
- Dragging file/directory to a directory icon can move the source item to the destination directory. If the destination directory is the parent directory, the source item is moved to the parent directory.
WARNING:Do NOT insert or remove the expansion card when it is busy to avoid any damage to it.
- Converting Background Image: ZLauncher can directly convert BMP/PGP/JPG files into background image databases. There's 3 ways for converting your own background image files:
Note:
- Drag a supported picture file to the Create BackImage/ShortCut button, then it will be converted into a background image, and set as the current background image automatically.
- Tap on the supported picture file for one second, then select "Back Image" from the popup menu. Then it will be converted into a background image, and set as the current background image automatically.
- Go to the Theme Manager, then open the BackImage, select a picture file, then tap the "Select" button from the pop up Operating Dialog. When you tap the OK button to exit the Theme Manager, the selected picture file be converted into a background image, and set as the current background image automatically.
- Because the JPG support is based on the Sony JpegUtil Library, which is only available on the Clie NR/NX/NZ series and Clie T650C/T665C/T675C. However, if you install the Sony JpegUtil Library(JEPG_Library.prc and JPEG_Util_Library.prc) to your handheld, the JPG support maybe work on the handheld(except for Palm T|T). You can find the Sony JpegUtil Library in the ROM of the above listed handheld models. NOTE: WE TAKE NO REPSONSIBILITY FOR USING THE Sony JpegUtil Library, YOU TRY IT AT YOUR OWN RISK.
- If the background image database is converted in the Theme Manager, it will be marked as a temporary background image. Once you change to other background image, temporary background image will be deleted from RAM automatically.
- If you want to get the best quality of the converted back image, you should change the display color to the proper depth before converting the image. For example, if the picture file is 16-bit color depth, you should change the display mode to 64K colors mode before the conversion.
- If the current display color depth is less than the color depth of the background image, it will not be available. For example, if the color depth of the background image is 16-bit, and the current display color depth is 8-bit(256 colors), then the background image will not be displayed.
- Modifying the picture files on desktop computer before the conversion is recommended.
- If there is no expansion card available for your handheld, you can convert the picture file in PalmOS Emulator which can do the job, then export the converted background image database from the PalmOS Emulator, and synchronize it to your handheld.
- ZLauncher supports all color depths of supported picture files. No exact dimension limitation for the picture files. If the background image is smaller than the screen, ZLauncher will tile the background image to full fill the screen.
- To import BMP/JPG files to the expansion card, you can use some software such as SyncWizard, CardExport. If you are using a Sony Clie, you also can use MSImport.Importing the picture files to the /Palm/Programs/ZLauncher/BackImage/ directory is recommended, so that the Theme Manager can recognize them.
- Setting Current Background Image: You can change the background image with the installed images. Go to the Theme Manager, then open the BackImage page, select one of the list backround image, then tap the OK button.
WARNING: Do NOT insert or remove the expansion card when it is busy to avoid any damage to it.
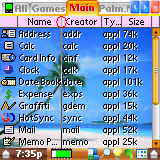
In Detail View, you may notice that some contents you are interest in are truncated. If you do want to display all of a truncated content, you can adjust the width of the corresponding title button to change the width of whole column.
For example: As the illustration below, the name of Memo Pad application is truncated since the its width is wider than the Name column's
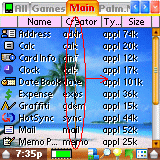
First, tap on the line between Name button and Creator button:
Now, an inverted vertical line appears. Then drag the line to right:
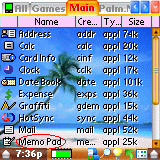
When the stylus moves a certain distance( enough for displaying whole name of Memo Pad), release the stylus and the Name column is become wider. The name of Memo Pad is no longer truncated.
- Hiding Application/Database:Each PalmOS database has its own database attributes. One of them - Hidden attribute - decides whether the database is visible. Modifying the Hidden attribute of a database can make it visible or invisible.
You can change the attributes of database in the Database Information form. Dragging a database to Information button can call up the Database Information form.
- If the application to be hidden is in RAM. Selecting the Attrs select trigger will call up the Database Attributes form. You can hide the application by checking the Hidden box, or uncheck the Hidden box of a hidden application to make it visible. This function is also available for the databases in RAM.
- Hiding File/Directory: Similar to database, file also has the Hidden attribute, and the operation of modifying file's attributes is similar to the operation on database too. Dragging the file/directory to File Information button can call up the File Information form. Modify the Hidden attribute can make the file/directory visible or invisible.
To display the hidden items, check the box of Show Hidden Items in ZL Preferences form.
WARNING: Do NOT modify the attributes of database/file if you don't know the exact signification of them. Any modification may cause the crash with other applications.
- Hiding Tab: Go to the "Tab Properties" form, check the box of "Hide tab" to mark the current tab as hidden tab. If you want to display the hidden tab, go to the "Preferences" form, check the box of "Show hidden tabs", or select the menu command "Tab > Show hidden tab".
Drag the source tab title to the destine tab title, then the source tab will be moved to the destine position.
Go to the expansion card tab, then drag the application file to "Create ShortCut/BackImage" button(the first button of the popup panel), then it will create a shortcut database for the selected application automatically. You also can first tap on the file for one second, then select "Short Cut" from the pop up menu. The created short cut database can be seen inside or outside ZLauncher.To create the Virtual ShortCuts for the applications in the /Palm/Launcher/ directory, please refer to section ZL Preferences.
You can change the date/time display format in the "Format" panel (launch application "Prefs", then select panel "Format").
If you want to uninstall ZLauncher, please follow the below stops:
- Uncheck the option of "Default launcher" in the ZL Preferences form.
- Exit to the system launcher by selecting the menu command: "App" > "Exit".
- Delete ZLauncher with the system launcher.
The above mentioned usage is just a part of the functions. We believe that you must can find more skills and use your handheld better with ZLauncher.
This is shareware. By registering this software, you not only show your respect for our copyright, but also encourage us to improve and update our work.
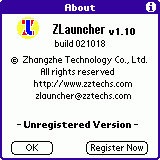
| Call up About ZLauncher form (Options >About / Register). Then tap the Register now button to call up the Register form
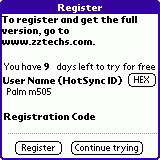
The Register form appears just like the illustration below:
At the location of Registration Code, enter your registration code. After filling in the code, you can continue to use this software, and enjoy our free update service. |
2.22 - 03/04/2003
- Added ability to preview supported picture files and Background Image database in full screen(inside or outside the Theme Manager).
- Added ability to activate the next tab by entering the "Space" character, and activate the previous tab by entering the "Back Space" character.
- Added an option to set ZLauncher as the default launcher or not. If the option is on, ZLauncher will be the default launcher even after a soft reset.
- Added an option to hide the Toggle Fullscreen button on the bottom bar on Clie NR/NX series.
- Added an option to make the records in the QuickLaunch+ list unique.
- Added an option for disabling the text shadow of the active tab.
- Added HiRes+ support for the Path Tree.
- Added a new option to the Hard Button Setup for going to the Theme Manager.
- Added an option to enable or disable displaying the Card app tag.
- Added an option for disabling the auto popup of the tools panel.
- Now drag & drop is also available for the Info/Category/New Tab/Trash Bin buttons on the bottom bar.
- Improved the Launching/Copy/Move progress dialog, now you can abort the operation freely.
- Reduced the dynamic memory usage, that increases the compatibility with other applications.
- Fixed the incorrect behavior of scroll button of popup list.
- Added support for viewing images with AcidImage.(This feature requires AcidImage 2.4n or higher version)
- Provided basic compatibility with Jot 2.0.
- Solved the problem of disabling the Virtual Graffiti function on Sony Clie NR series after returning from MS Dict 2.02.
- Basically solved the problem of slow redrawing when launching an application if Butterfly Hack is active.
- Fully support for Palm Tungsten | W.
- Better HiRes+ support.
- Fixed the inaccurate information of Memory and Exp. Card buttons on some occasions.
- "Auto hide tab captions" was moved to the Display Setup form, "ROM Tag" was moved to the Icon Setup form.
- Miscellaneous updates and bug-fixed.
2.21 - 01/13/2003
- Changed Bottom Bar Setup to Top & Bottom Bar Setup. Added ability to configure the Top Bar in the Compact mode. Now Exp. Card button is also availabe for Compact mode.
- Improved Theme Manager. Now it lists the size of every listed database/file, and displays the free RAM and Card space. You also can view the information of the Back Image DB. And added support for JogDial and 5-Way Navigator.
- Fixed the reset occurs when browsing the expansion card with Detail View in some occasions.
- Fixed the reset occurs when copying/launching file from expansion card on some handheld models..
- Fixed the incorrect behavior of Command Bar in fullscreen mode with no status bar on Clie NR/NX series handhelds.
- Fixed the incorrect information of Exp. Card button on some handheld models.
- Fixed the bug in popping up the Clock with silk clock button on Palm M series, and with Select button on Palm Tungsten | T.
- Fixed the bug of automatic activating next tabs when turning on the handheld on some handheld models.
2.20 - 01/06/2003
- Added Theme Manager, which gives you the best convenience in managing Themes, IconSets and background images. You can store the unused themes, icon sets, and background images on the expansion card, and select them from expansion card with the minimum manipulations. You also can put the supported picture file to the /Palm/Programs/ZLauncher/BackImage/ directory and select the them in Theme Manager directly. With the help of the new Theme Manager, you can manage and change the theme/icon set/background image quickly and easily.
- Added ability to specify the function of long pressing JogDial's Back button and the Select button of 5-Way Navigator.
- Added ability to indicate whether a directory is empty or not through the different icons. Now you can know clearly which directory is empty and you can delete it without a thought.
- Improved the algorithm of poping up panel, reduced the unecessary poping up panel when an object is being moved.
- Improved the support for applications stored in the /Palm/Launcher/ directory GREATLY. Now you can copy/move app from RAM to the /Palm/Launcher/ directory or from the /Palm/Launcher/ directory to RAM easily and quickly. You also can delete the app which is stored on the /Palm/Launcher/ directory directly without going to the /Palm/Launcher/ directory. The apps in the /Palm/Launcher/ directory are more similar to the ones in RAM.
- Changed the function of ZL Preferences button in the bottom bar. Now you can pop up a list of all setup forms by tapping the original ZL Preferences button in the bottom bar.
- Improved the progress indicator of launching Card-programs.
- Added an Exp. Card button to display the free space of the first expansion card.
- Compatible with Biorythm DA.
- Miscellaneous enhancements, updates and bug-fixed.
2.10 - 12/23/2002
- Ability to launch DA. You also can add a DA to the QuickLaunch+ as a favorite app.
- Added ability to display the total size of the app and its related databases in Detail View.
- Added the Show/Hide Hidden Tabs button that can be customized to the bottom bar.
- Added Ability to change the font of the CategoryLabel Button.
- Compatible with MSMount.
- Reduced the usage of Dynamic memory that increasing the stablity & compatibility of ZLauncher.
- Fixed the bug of modifying attributes of directory.
- Fixed the error when you access an expansion card with Path Tree that the expansion card is hidden.
- Fixed the bug in changing the shadow color that is darker than the icon text color.
- Fixed some minor bugs on the CategoryLabel Button.
- Miscellaneous enhancements and updates.
2.00 - 12/17/2002
- Added Compact UI mode which is similar to the system launcher, providing a fresh & clean look. Now Tab-based UI is optional.
- Ability to customize the bottom bar with rich funtion buttons. Time / Battery / Memory indicated buttons are optional now. You can setup the bottom bar with 30+ different buttons, and there are 11 buttons can be set at one bottom bar at maximum.
- Ability to toggle the bottom bar to make the screen more clean.
- Ability to change the color of Time / Memory / Battery / Path / Category Label individually.
- improved the support for Palm's 5-Way Navigator. Now it's much similar to the system laucher. Plus the improvement that can go to the next/previous tab by simply pressing right/left.
- Miscellaneous enhancements and updates.
1.50 - 12/06/2002
- Added support for the /Palm/Launcher/ directory of expansion card. Ability to import the apps in the /Palm/Launcher/ directory automatically without copying them into internal memory or creating short cut for them. You can categorize all apps in the /Palm/Launcher/ to any app-tab. The categoriy information will be keeped even you remove the expansion card then insert it again.
- Added a menu option for manual refreshing apps' cache.
- Ability to setup the Tap & Hold period of the popup menu.
- Ability to change the font of tab captions.
- Ability to change the font of popup menu & QuickLaunch+ list.
- Ability to tap the most top empty area of the screen to activate the menu.
- Miscellaneous updates and bug-fixed.
1.40 - 11/24/2002
- Added support of full screen transparent UI.
- QuickLaunch+ - Enhanced QuickLaunch list that ability to record your favorite/common used/recent used apps. You also can launch the top 10 apps in the list by simply inputting the corresponding index number([Menu Command Key] + 0 ~ 9).
- Added support of small icon & font for High-Density handhelds such as Palm Tungsten | T, Acer S50/S60.(The small font support requires latest ZL_Theme_AquawoodXP_Hi_64K.prc).
- Added support of double pressing Back key of JogDial to pop up the Tabs List.
- Ability to disable the support of high-density icon for Clie HiRes handhelds, which can speed up the icon display.
- Added the remaining memory in megabytes and remaining power in voltage for Memory/Battery button.
- Miscellaneous updates and bug-fixed.
- ZReaderLite v0.2 is PalmOS5 & HiRes+ compatible now.
1.32 - 11/14/2002
- Fixed the resets when a BugME! v4.3 alarm goes off.
1.31 - 11/12/2002
- Reduced the memory usage, fixed the problem in converting large picture into background imge.
- Fixed the Virtual Graffiti area issue when launching the HiRes+ application.
- Make tab title transparent when the option of "Graphic tab" is disabled.
1.30 - 11/11/2002
- Full support for PalmOS 5 handhelds(Palm Tungsten T, Clie NX70/NX60).
- Full support for Palm 5-Way Navigator.
- Added more fonts for the icon text.
- Fixed the flicker problem of Time/Memory/Battery status refreshing.
- Ability to display the thumb bitmap of PGP as the file icon.
- Miscellaneous updates, speed improvements and bug-fixed.
1.20 - 11/01/2002
- Add pop-up operating menu. Tapping on an item for a while will pop up an operating menu. Highlight an item, and press the JogDial for a while also can pop up the operating menu.
- Support of converting PGP or JPG(with the Sony Jpeg Decode Library, which is available for Clie NR70/NR70V/T650C/T665C) into background image DB.
- Ability to hide tab caption automatically, only display the caption of the active tab.
- Ability to scroll tabs with PageUp/PageDown button.
- Ability to tap a database to launch its owner(same CreatorID) app.
- Add Power Off button on non-NR/NX series handhelds.
- Ability to adjust the contrast levels individually. This function is extreme useful for the non-color devices.
- Ability to toggle DateTime button to the state of time/date/days of week.
- Fix the bug of viewing/modifying attributes of app/db.
- Miscellaneous updates and bug-fixed.
1.10 - 10/21/2002
- Ability to hide tabs & tab captions, rearrange tabs, and set up tab icon.
- Implement short-cut function. User can make short-cut of program which saved on expansion card, and categorize them into Application Categories.
- Add function of cache information of deleted application. Now ZLauncher works normal with PiDirect.
- Change the rule of Application Category. Now Application Category can contain applications and launchable databases, user can categorize either application or launchable database.
- Speed up the Pop-up panels.
- Speed up the process of generating Path-Tree.
- Make the category information of ZLauncher individual. Now the category information of ZLauncher isn't synchronized with the system's automatically. And user can overwrite the system category information with ZLauncher's manually.
- Add List Mode of item view modes.
- Add support of displaying High-Density icon of application on Sony High-Resolution handhelds..
- Support all PalmOS system time & date display format.
- Add function of changing icon name of (RAM or ROM) application .
- Add support of MS Autorun.
- Add two fonts supported for Sony High-Resolution handhelds.
- Add percentage mode of Memory / Battery status.
- Better JoyDial/Rocker Switch control.
- Add support of copying/moving items in Application Category tab to expansion card with Category button.
- Ability to change icon text shadow color and Time/Battery/Path button text color.
- Fix the bug of crashing with BugMe 4.0. Many bugs in the similar case should be fixed.
- Fix the bug of confusing with the Clock silk button on Palm m series.
- Fix the crash of viewing HotSync information while BatteryLog Hack is active.
- Compatible with PageDown Hack and NR Buttons.
- Fix the bug of converting 32-bit color depth BMP file into background image.
- Miscellaneous updates, speed improvement and bug-fixed.
1.00 - 08/22/2002
- First release is issued on August 22, 2002.
|
This software is shareware. You may distribute it without modifications and not for profit-making purpose.
We take no responsibility for any loss of data or other failures.
Once you run this program, you are assumed to have accepted the above terms.Please contact us if you want to modify it or use it for commercial purposes.
Free trial period of ZLauncher is 30 days, register user can get free upgrade version from http://www.zztechs.com .
If you have any problem or advice on ZLauncher, please let us know.
Guangzhou Zhangzhe Technology Co., Ltd.
http://www.zztechs.com
Telephone:+86-20-87565379
Fax:+86-20-87543133
E-mail:zlauncher@zztechs.com
Address:R11A, Jianfeng Building, No. 8, Tian He Nan 2 Road, Guangzhou, China
Zip: 510620
Copyright (C) 1999-2002 by Guangzhou Zhangzhe Technology Co., Ltd., All rights reserved.Thank Larry Miller for the assistance in updating this user manual.